Progression Guide
This guide will cover useful content for progression. This is not a step by step guide but instead a guide to help players get started. For info on all the content in MapleStory, check out the Level Content Guide
Quick Jumps
- Introduction
- Job Advancements
- SP + AP Distribution
- Inner Ability
- Pocket Slot
- Gold Emblem + 4th Job
- Intense Power Crystal
- Hyper Skills + Hyper Stats
- Lv. 140 and Beyond
- 5th Job Advancement & Arcane River
- V Matrix + Nodestones
- Legion System
- Reward Points + Maple Rewards Shop
- Auction House in Interactive Worlds
- Important Content
- Important Questlines to Complete
- Equipment Content
- Bosses
- Daily and Weekly Quests
- Maple Planner
- Training Maps
- Theme Dungeons
- Quests
Introduction
Some brief advice, don't worry about dailies and bosses until after Lv. 200 and 5th Job Advancement. Even past Lv. 200, focus on levelling up, filling all equipment slots, and completing pre-quests
All classes are weak early on, especially if this is your first character. As you reach Lv. 200 and beyond, enemies get stronger and tougher but will become easier as you progress
Choose classes that look enjoyable or interesting. Don't rely on DPM charts or look for the 'best' class since to become as strong as they are suggested because it is a massive time sink. As well, DPM charts do not translate to the actual DPM in-game as they are created under very specific conditions
Good luck on your Maple journey!!
Job Advancements
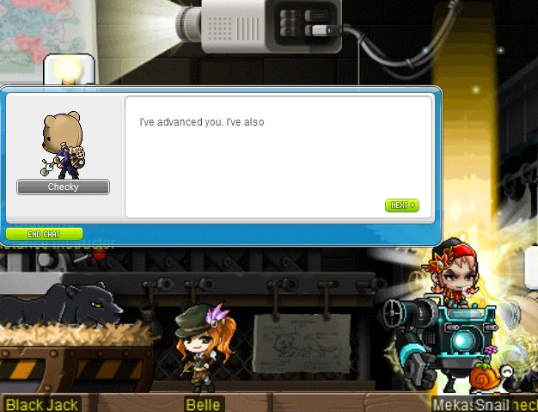
Most classes gain new skills through Job Advancements at Lv. 10, 30, 60, 100, 200, and 260. These are known as 1st, 2nd, 3rd, 4th, 5th, and 6th Job Advancements
5th Job and 6th Job both have unique skill systems that are different from your 1st - 4th Job Advancements
To start your Job Advancement, open your Maple Guide, "U" by default, and click on the button that labelled as "Job Advancement Quest"
[Note]: Dual Blades have two additional Job Advancements at Lv. 20 and Lv. 45 that are an add-on to your 1st and 2nd Job
[Note]: Zero do not have Job Advancements and instead unlock new skills by levelling up
SP and AP Distribution
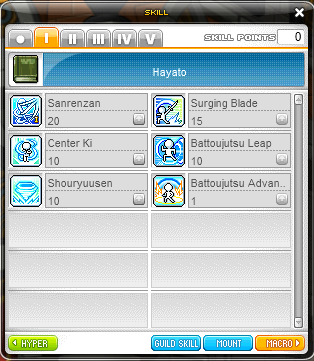
All characters can max all 1st - 4th Job skills
A tip for allocating SP is to put 1 SP in each skill and then max skills that require the least SP to reach Master Level, then passives, buffs, and lastly attacks
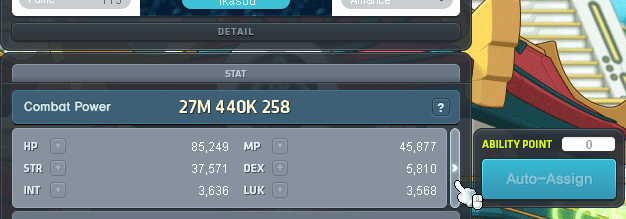
AP can be assigned using "Auto Assign" in the Character Info UI. 5 AP is gained each level up and 5 AP each Job Advancement from 3rd - 4th Job
[Note]: For Xenon, distribute your AP evenly between all 3 stats using Auto Assign. The game will let you know when you've reached the requirement for the Multilateral skills. Past Lv. 200, you continue to evenly distribute your AP
[Note]: For Explorer Pirates, choose STR only if you are creating a Buccaneer and DEX only if you are creating a Corsair
Inner Ability
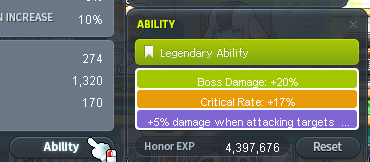
Inner Ability is located in the Character Info UI and is automatically unlocked at Lv. 50
Inner Abilities are rereollable stats similar to Item Potentials but tied to each character. They can be rerolled using 
 Honor EXP
Similar to Potentials, there are Rare, Epic, Unique, and Legendary tier stats. You can tier up by using Honor EXP to reroll your Inner Ability and rerolling will not lower your tier
Link Skills
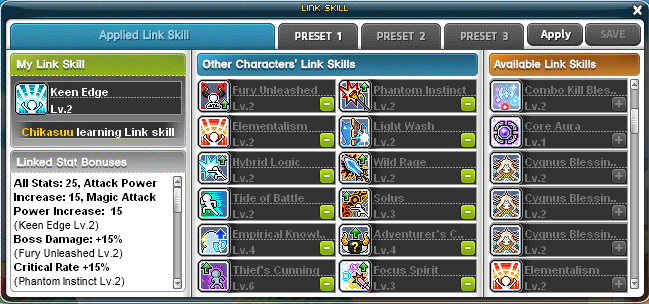
Upon reaching Lv. 70, each class has a Link Skill that can be shared with another character where both characters gain the effect of the Link Skill
Link Skills improve at Level 120 (Skill Level 2) and in GMS again at Level 210 (Skill Level 3)
Explorer and Cygnus Knights Link Skills can stack to increase the strength of the Link Skill by linking each unique class
Pocket Slot
Upon reaching Lv. 30 Charm Trait, the equipment slot for Pocket Items is automatically unlocked
Traits located in the Professions UI, "B" by default provide special bonuses upon reaching certain levels like unlocking Pocket Slot or increasing %Ignore DEF
To increase your Charm, use 
 Cologne,
  Trait Boost Potions found in Event Shops, increasing your Fame level, wearing special equipment or Cash Items, or changing your hair
To learn more about Traits, check out: https://maplestorywiki.net/w/Traits
Gold Emblem + 4th Job
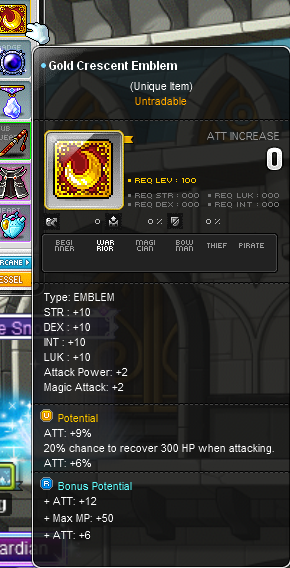
At Lv. 100, a free Gold Emblem is given by accepting a Lightbulb Quest on the left side of the screen. Emblems are important because like Weapons and Secondary Weapons, are the only equipment that can obtain %Ignore DEF and %Attack potential lines
Emblems cannot obtain %Boss Damage
Upon reaching 4th Job, you should upgrade all equipment and Star Force them to 10 stars if possible. It does not matter if the gear will be replaced, this will help you to defeat enemies
 Intense Power Crystals:
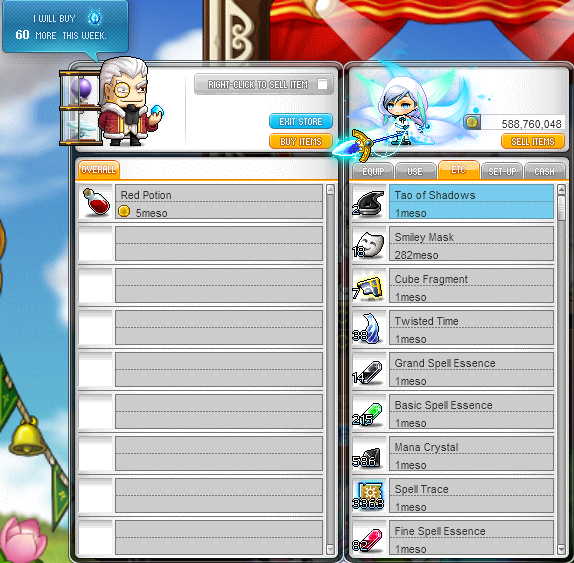
Most bosses drop [Intense Power Crystals] that are sold for Mesos. The price of the Intense Power Crystal is determined by the difficulty of the boss, if the boss is daily or weekly, and the number of party members when clearing. The crystals are divided into the following categories:
 Daily
Daily Weekly
 Monthly
Intense Power Crystals are sold to the Collector by pressing the "Quick Move" button below the minimap from any town. accepts 180 crystals a week per world and resets on Thursdays 12am UTC. However, the Collector will only accept 12 weekly crystals
Hyper Skills + Hyper Stats
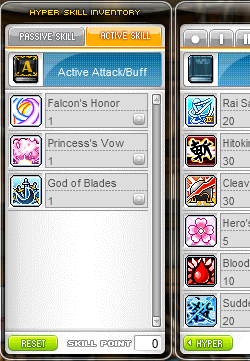
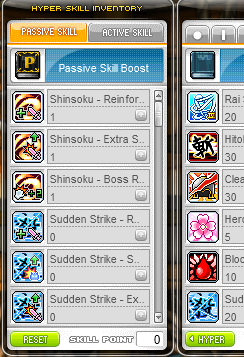
Upon reaching Lv. 140, Hyper Skills and Hyper Stats are unlocked. Hyper Skills have a passive and active category. Active Skills are unlocked at Lv. 140, 160, and 190. Passive Hyper Skills provide benefits typically to 4th Job skills. 1 SP is gained for your Passive Hyper Skills at Lv. 140, 150, 165, 180 and 190 (total of 5 SP)
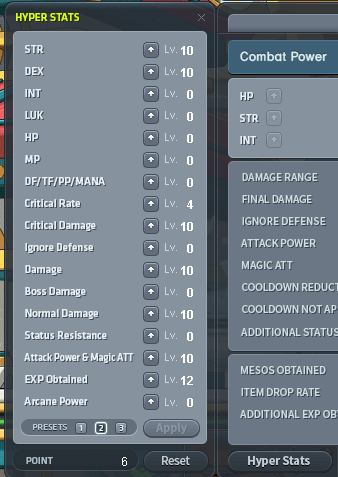
Hyper Stats points are gained each level to allocate into stats like %Crit Rate, %Crit Damage, %Ignore DEF, %Damage, and %Boss Damage. As you level up a Hyper Stat, it will cost more to upgrade. The amount Hyper Stat points gained increases every 10 levels
Hyper Stats are dependent on your current needs, thus there is no optimal build. For example, are you optimizing for bossing or mobbing? Do you need more damage or crit rate?
A useful tool for deciding where to allocate your points can be found here: SuckHard's Maplestory Calculators
For more info on Hyper Stats, check out: https://strategywiki.org/wiki/MapleStory/Hyper_Stats
Level 140 and Beyond:
Upon reaching Lv. 140, remember to fill all equipment slots and Star Force each equipment to at least 12 Stars. As well, reveal all the potentials on your equipment and to use cubes to reroll for some %Main Stat or Epic Potential
For more info on enhancing equipment, check out https://www.grandislibrary.com/contents/upgrading-enhancing-equipment
For extra mesos, equipment, and  Mystical Cubes, try the following bosses from the < 2k Main Stat section of the Bosses
As well, complete ![]() Maple Tour every day for Mesos
Maple Tour every day for Mesos
5th Job Advancement & Arcane River
Mandatory Requirements to accept 5th Job Quest:
- 100 Star Force minimum accumulated total
- 10 Star Force on Primary Weapon
Requirements to Job Advance: 

- After talking to the Memory Keeper and Temple Keeper, you'll receive a quest called "5th Job: Blessing of the Goddess". Talk to all the Goddesses within the Horizon Portal to job advance to 5th Job
- Each goddess will give you an
 Arcane Stone which you can charge up by defeating monsters. Once the stone has been charged, you can use it again to gain some EXP
- You do not need to charge the stones up to Job Advance
After Advancement, obtaining an Arcane Symbol: To effectively damage monsters in the Arcane River, Arcane Power is required similar to Star Force which you gain from equipping Arcane Symbols
- To obtain your Arcane Symbol, you must complete the quest "A Greater Power" located in your Lightbulb Quests. This quest is intentionally difficult as you have no Arcane Power
- The initial symbol you obtain is not a real Arcane Symbol yet until you complete the Vanishing Journey storyline. In the meantime, you must complete the story with the limited Arcane Power you have
- [Tip]: If you are struggling to defeat the monsters, there is a Hyper Stat for Arcane Power, allocate some points temporarily until you get enough Arcane Power
5th Job V Matrix + Nodestones
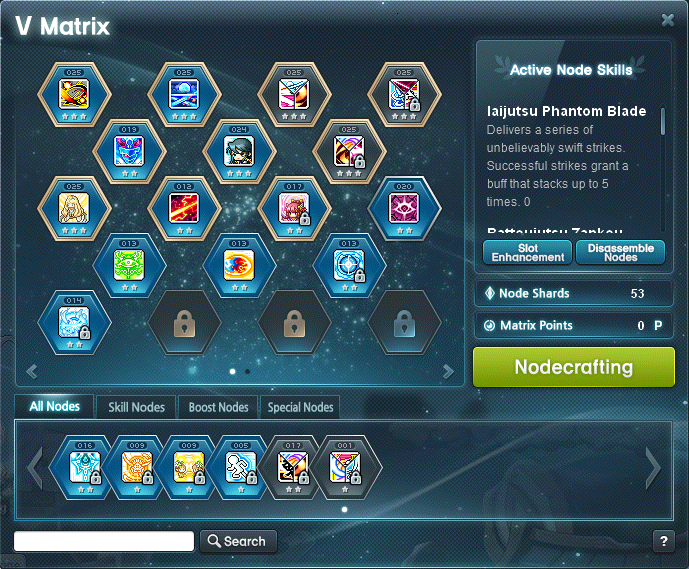
Unlike previous Job Advancements, in 5th Job, skills are gained from equipping "Nodes" into your V Matrix to unlock new skills and passive boosts to 1st - 4th Job skills. Nodes are gained by opening  Nodestones that are obtained from monsters in the Arcane River, Vanishing Journey Weekly Quest, Nodecrafting, and Event Shops

To view your V Matrix, open the Skill UI, "K" by default, and click to the "V" tab and press the "V Matrix" button at the top
You will notice you have empty slots and locked slots. Additional slots are unlocked as by levelling up which will allow you to equip more Nodes and in turn more 5th Job Skills. Additionally, you can pay Mesos to unlock slots early. To equip a Node, double-click or drag them into an empty slot
All classes have main 5th Job Skills that are exclusive to that class. There are also 5th Job Skills exclusive to a certain Class Group like Explorers or Cygnus Knights. Lastly, there are Common 5th Job skills that are available to all classes
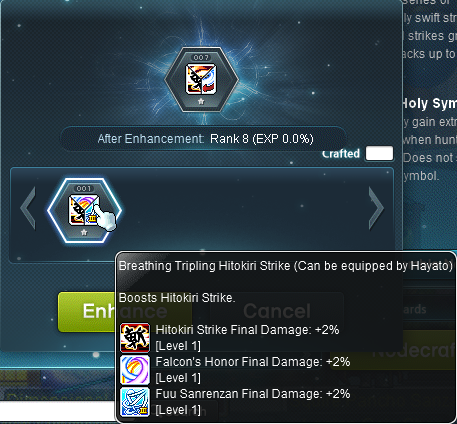

SP is not gained normally like previous Job Advancements to level up your skills. Instead, skill levels are gained by enhancing equipped Nodes. Each Node will have a Rank and EXP associated with it. To enhance a Node, copies of the same Node are used to gain EXP to rank up a Node. Upgrading a Node's Rank will increase the associated skill's level
There are 3 types of Nodes:
 Skill Nodes: These contain the main 5th Job Skills themselves
- A Skill Node has a max Rank of 25 or Master Level of is 25 (30 with Matrix Points)
- Only one copy of a Skill Node can be equipped at once
 Boost Nodes: These are passives that increase the %Final Damage of your 1st - 4th Job Skills. They also provide different bonuses based on the Skill Level of the node such as extra %Crit Rate or %Ignore DEF
- Each Boost Node will enhance 3 different Skills. When you hover over a boost node in your V Matrix, the Main Skill that is used for leveling up a Boost Node will be the skill at the top. You will need multiple Boost Nodes with the same Main Skill to upgrade a Boost Node
- Boost Nodes with the same Main Skill cannot be equipped together
- Each Boost Node has a max Rank of 25 but each boosted skill can reach a Master Level of 50 (60 with Matrix Points) by equipping two Boost Nodes that boost the same skill
 Special Nodes: These nodes provide a special effect that trigger once you've fulfilled a specific requirement
- They cannot be leveled up and have a timed duration however, the duration can be extended
- It is best to disassemble these nodes for Node Shards that are used to craft new Nodes
Matrix Points
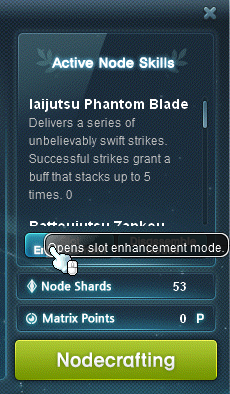
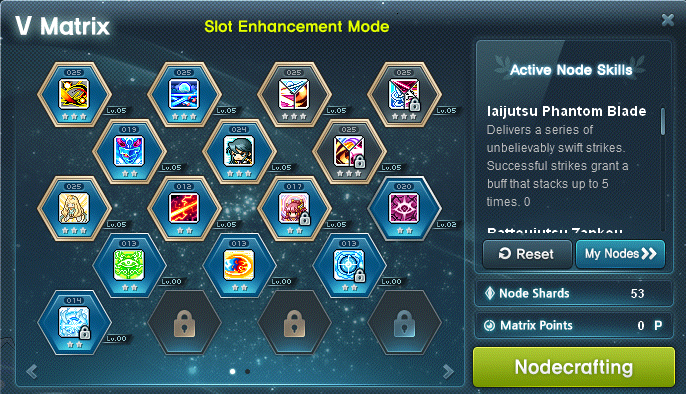
Each time your character levels up, you gain a Matrix Point. Matrix Points are used to raise a Node's Rank but they are tied to the Node Slots themselves instead of the Node. Each slot can allocate up to 5 additional Ranks for a Node. This means each Skill Node or Boost Node can reach a max Rank of 30. You can assign your Matrix Points in the V Matrix by pressing the "Slot Enhancement" button
Node Enhancing
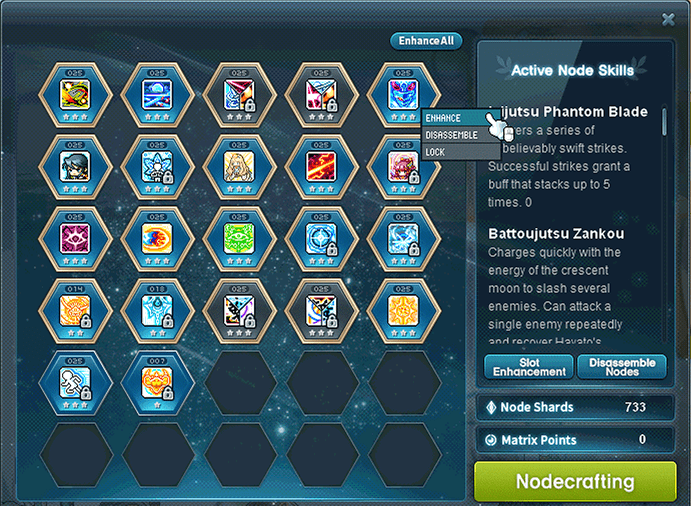
To enhance your Nodes, right-click a Node or press the "Enhance All" button to enhance multiple Nodes at once. Enhancing Nodes requires consuming multiple copies of the same Node to gain EXP to level up a Node. As mentioned previously, to enhance Boost Nodes, you need Nodes with the same Main Skill. All Nodes have a max Rank of 25 meaning each Node provides 25 Skill Levels for a skill
To gain additional Nodes, you will need to open  Nodestones which will give you a random Node for your class. You can obtain Nodestones from monster drops in the Arcane River, from the Weekly Quest in Vanishing Journey, Nodecrafting, and from Events
There are also special Nodestones called  [Experience Nodestone] which when opened provides an EXP Node that can be used on any Node as EXP. These Nodestones are only obtainable from Events
Node Disassembling

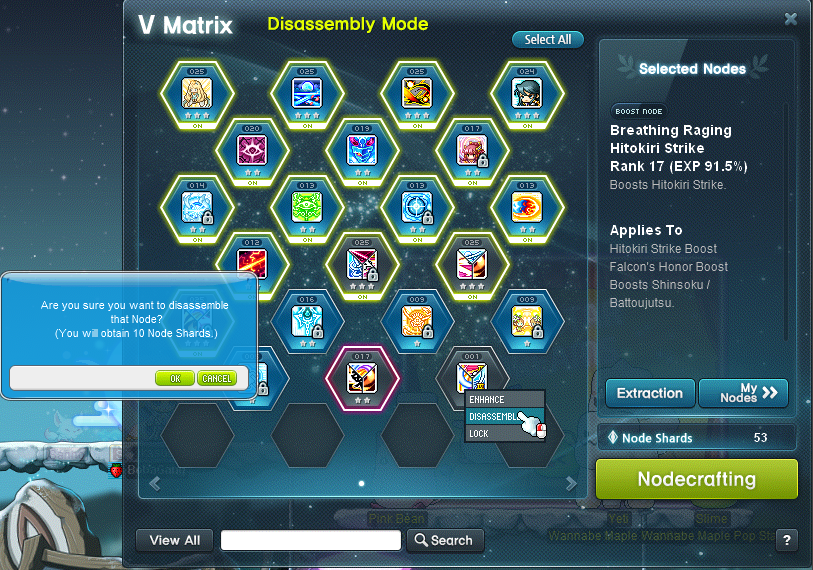
Nodes can be disassembled to gain Node Shards that are used to craft more Nodestones or a guaranteed Node. To disassemble Nodes, press on the "Disassemble Nodes" button beside the "Slot Enhancement" button
You can select multiple Nodes to disassemble at a time or right click to select to disassemble a single Node
Nodecrafting
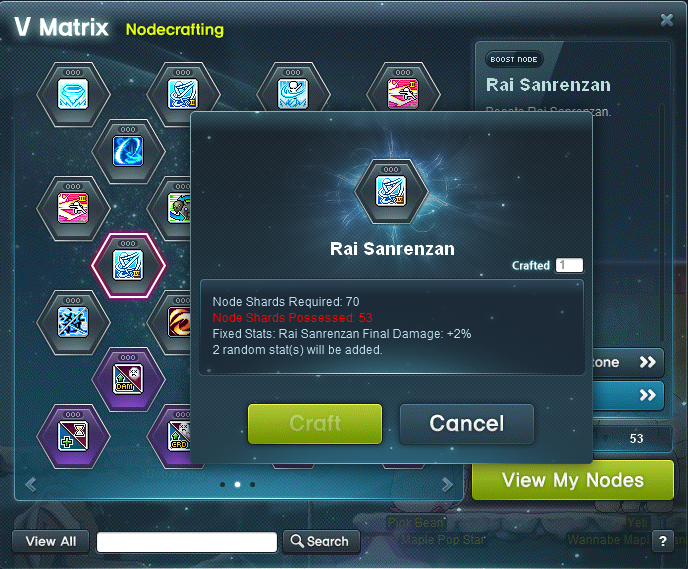
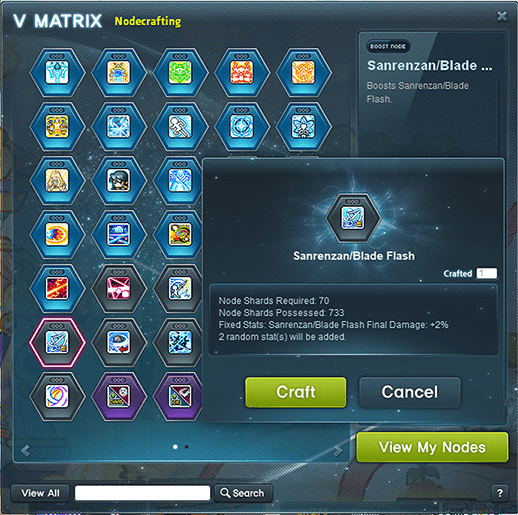
Nodes can also be crafted by pressing the "Nodecrafting" button. To craft Nodes, you will need Node Shards which are obtained from disassembling Nodes
In the Nodecrafting UI, select the skill you want to boost as the Main Skill on the Node and press the "Craft" button to get a Boost Node containing the specified Main Skill and 2 random skills. Do not press the "Craft Nodestone" button as you will craft a Nodestone instead
Additionally, a Boost Node with a given combination of 3 skills can be crafted by pressing the "Craft Custom Boost Node" button however, this will cost more Node Shards
Other Functions
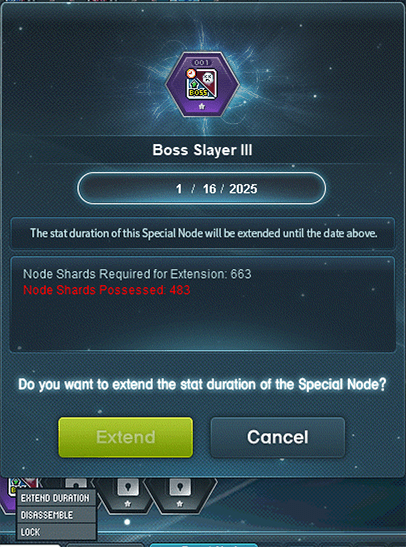
Extend Special Node
Using Node Shards, the duration of Special Nodes can be extended by right-clicking the node. Expired Special Nodes can also be extended
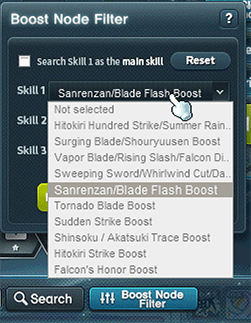
Boost Node Filter
There is also a function to filter search for a specific Boost Node by pressing the "Boost Node Filter" button. This function will search for Boost Nodes with the given combination
Legion System
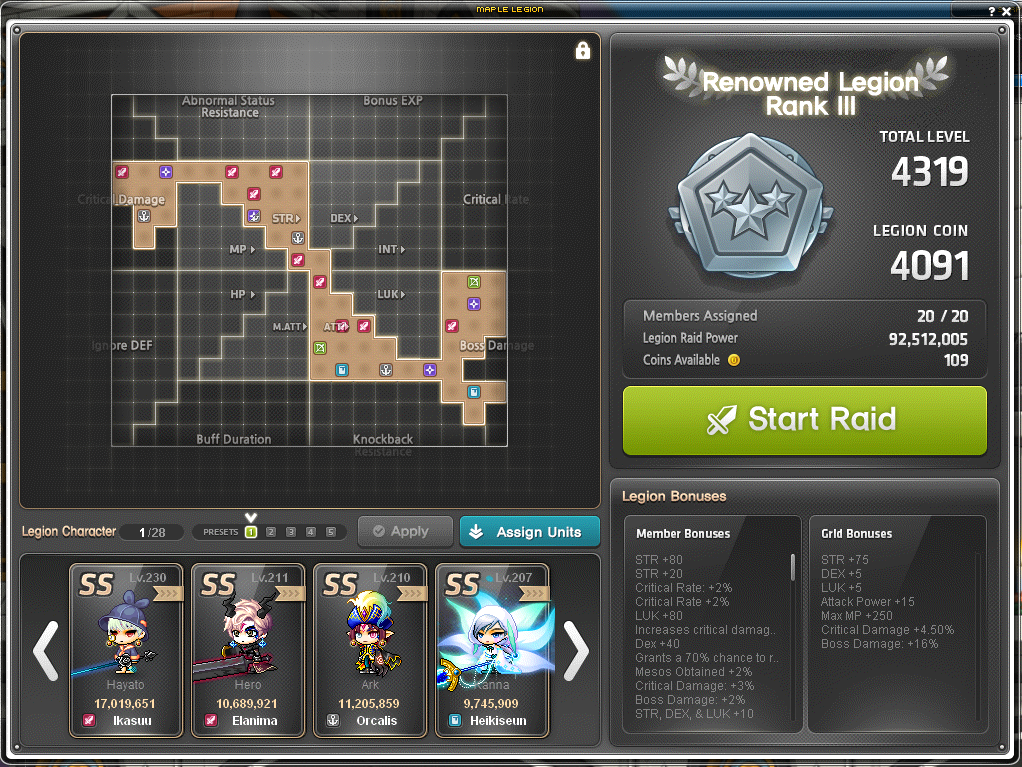
The Legion System is unlocked upon completing one of the following:
- Accumulated total of 500 levels within your World
- Reached Lv. 200 and completed the 5th Job Advancement
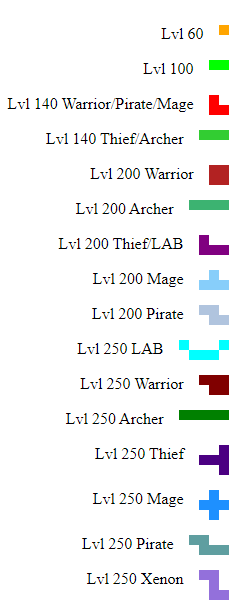
The Legion Board grid is divided by different stats. By assigning characters onto the grid, each character will provide a "Legion Bonus" effect and a stat bonus depending on where it is assigned
The "Total Level" or "Legion Level" is based on your 42 highest level characters. The higher your Legion Level the more characters you can assign to your grid. By using  [Legion Coins] your Legion Board can be upgraded by talking to Dame Appropriation to upgrade your board. Legion Coins are gained passively based on your characters currently assigned to the grid
Legion Coins are used to exchange items from Squire Pancho Sanza such as:
 [EXP Booster]
 [Drop Rate Booster]
 [Meso Rate Booster]
 [Epic Potential Scrolls]
 [Hard Cube]
 [Bonus Potential Scrolls]
 [Powerful Rebirth Flames]
Reward Points + Maple Rewards Shop
 Reward Points are used in the Cash Shop at the Maple Rewards Shop or to apply a 30% discount to certain Cash Shop purchases
Reward Points expire at the end of the next month that the points were obtained. So if you obtained some Reward Points in August, the points would expire on September 30th
The Maple Rewards Shop contains a variety of Cash Shop items available for purchase with Reward Points. There is a purchase limit to each item per month per account, and items restock every month
Some notable items in the shop are:
 [Bright Cube]
 [Glowing Cube]
 [Premium Water of Life]
 [Monster Park Additional Entry Ticket]
 [Pet Snack] (Interactive Worlds only)
 [Etc/Set-up/Use/Equip/Storage Add 8 Inventory Slots] - Unlimited purchases (Interactive Worlds only)
 [Shielding Ward] (Interactive Worlds only)
 [Shield Scroll] (Interactive Worlds only)
 [Guardian Scroll] (Interactive Worlds only)
 [1-day 2x EXP Special Coupon] (Interactive Worlds only)
 [Platinum Scissors of Karma] (Interactive Worlds only)
Some ways to obtain  Reward Points are:
- Defeating bosses and completing a quest in the pink giftbox tab on the left-hand side of the screen
- The giftbox should have stars on it and a "C" with a ribbon
- The quests are automatically accepted each day, you just need to remember to hand it in or else it will not reset
- Monster Collection Explorations
- Playing MapleStory M, the mobile game
- MAPLE Daily Gift Reward
Auction House in Interactive Worlds:
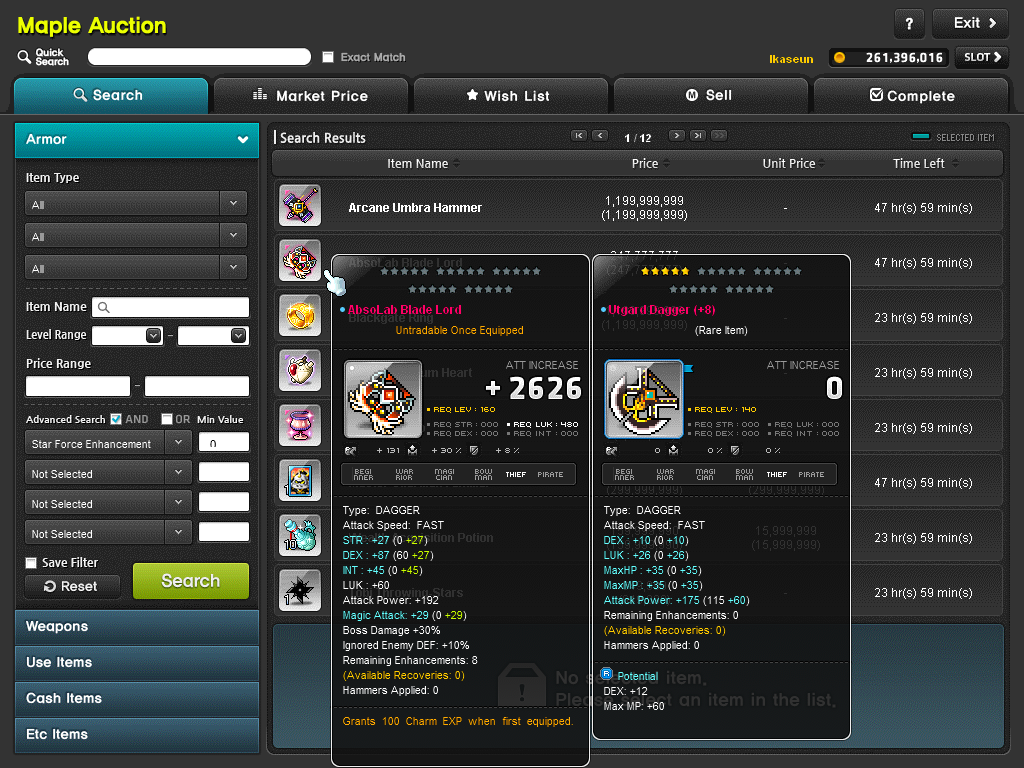
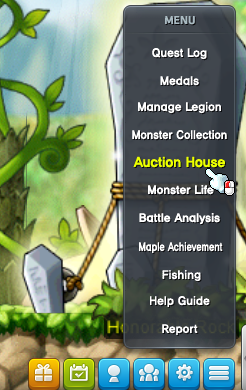
The Auction House is a system in Interactive Worlds to buy and sell items with other players. You can buy anything from equipment, consumables, or cosmetic items like chairs and cash clothing. As well, you can also buy Wonderberry pets here that pick up items for you
Important Content
- [Interactive Worlds] Spell Tracing:
 Spell Traces are used for upgrading gear based on the number of "Remaining Enhancements" an equipment has
- [Heroic Worlds]: Can be sold for Mesos
- Star Forcing: Gear enhancements that provide stats based on the number of succssful Star Force on an item
- [Lv. 35] Professions / Crafting: Crafting may be useful if you cannot find new gear for earlier levels

 [Special Rebirth Flames] and
 [Special Cubes] can also be crafted using Professions
- [Traits Stats]: Traits are also found in the Professions UI that grant small bonuses
- [Lv. 50] Inner Ability: Rerollable stats similar to potentials but tied to your character that are rerolled using

 Honor EXP
 - [Lv. 70] Link Skills: Class-Unique skill that can be shared with another character in your World
- [Lv. 100+] Star Force Maps: Training maps that require a minimum amount of Star Force Enhancements on your equipment to deal damage to monsters that have more HP but give more EXP
 [Lv. 105+] Monster Park: Stage-based dungeons that reward a considerable amount of EXP and
  [Monster Park Commemorative Coin] for exchanging items
- Special shop sells special potions


 that grant useful buffs
 - Completing Monster Park 77 times for each day of the week rewards a
 [Medal] that gives +10% Ignore Enemy Defence
- Special shop sells special potions
 [Lv. 105+] Maple Tour: Stage-based dungeons that reward Mesos and
  [Maple Tour Coins] for exchanging items
- Mesos are accumulated and can be retrieved 7 days later for the full amount or retrieved earlier for half the amount
 [Lv.125+][Heroic World] Von Leon:
  Royal Von Leon equipment dropped by the boss Von Leon is considered a Boss Item and gains additional Bonus Stats
 [Lv. 140] [Heroic World] The Far East (Yu Garden): Provides an easy source of
  [Epic Potential Scrolls] in Heroic Worlds
- [SPECIAL] Legion System: A system that provides useful stats which is unlocked upon accumulating a total of 500 levels within your World or after reaching Lv. 200 and completing the 5th Job Advancement. By assigning characters onto a grid, bonus stats are given to all characters in the same World. Additionally,
 [Legion Coins] are generated passively that can be exchanged for items
- Notable Items:
 [EXP Booster],
  [Drop Rate Booster],
  [Meso Rate Booster],
  [Epic Potential Scrolls],
  [Hard Cube],
  [Bonus Potential Scrolls] and
  [Powerful Rebirth Flames]
- Notable Items:
Important Questlines to Complete
-
 [Lv. 100] Heliseum: Unlocks access to the boss
  Magnus and daily quests for
  Shadowdealer Coins use to exchange items from Mayala
- Notable shop items:

 [Superior Cape],
 [Superior Shoe],
  [Superior Belt],
  [Antique Root Gloves]
  [Antique Leaf Cape]
- Notable shop items:
 [Lv. 120] Lion King's Castle: Unlocks access to the boss
  Von Leon
 [Lv. 125] Root Abyss: Unlocks access to the bosses
  Crimson Queen,
  Pierre,
  Von Bon, and
  Vellum
 Coins dropped from the bosses are used to exchange items like
 equipment for Transfer Hammer
 [Lv. 130] Temple of Time: Unlocks access to the boss
  Pink Bean
 [Lv. 140] [Silent Crusade] A Cry for Help: Unlocks access to the boss
  Arkarium
 [Lv. 165] Gate to the Future: Unlocks access to the boss
  Cygnus
 [Lv. 160] [Masteria Epic] Lost Hero's Call: Completing the epic, Masteria Through Time rewards
  [Medal],
  [Subani-Roid] OR
  [Dr. Jang-Roid] androids
 [Lv. 180] Hieizan: Unlocks access to the boss
  Princess No
 [Lv. 210] Ramuramu: Unlocks access to the boss
  Guardian Angel Slime
Equipment Content
- Level beside items are when they can be obtained or equipped
- For a more in-depth guide to Gear check out: https://docs.google.com/presentation/d/1cvwscy79thl_jahbjQlw60KzIiEEYUFd7gBwqajACfY/preview#slide=id.p
- Can be applied to Interactive Worlds too
- For more info on equipment in the game check out: https://maplestorywiki.net/w/Item
Lv. 10 - 120:
- [Lv. 10 - 40]


 Purchasable from your class' hometown or dropped by monsters around your level
 - [Lv. 40 - 110]


 Dropped by monsters around your level or crafted with the Blacksmith Profession
 - [Lv. 30]

 (Riena Strait)
  (Gold Beach)

 (Ellinel Fairy Academy) [Face / Belt / Earrings / Eye / Glove / Cape ] Theme Dungeon Rewards
 - [Lv. 40]
 [Face] Dropped by Captain Darkgoo in Gold Beach
 - [Lv. 40 - 140]


 [Ring / Face / Shoulder] Obtained from Accessory Crafting Profession
 - [Lv. 60]

 [Hat / Overall] Obtained from Cooking With Tangyoon PQ
 - [Lv. 65]

 [Pendant / Cape] Obtained from Mushroom Castle Theme Dungeon
 - [Lv. 75]


 [Totems] Obtained from The Afterlands Theme Dungeon
 - [Lv. 75]
 [Pendant] Purchasable from Monster Park using
  [Monster Park Commemorative Coins] that increases equipment drop rate
 - [Lv. 90]
 [Lv. 50 Hat] Dropped by Zakum
 - [Lv. 100]


 [Secondary Weapon] Can be bought from Neville
- Excludes certain classes who use Shields and Dual Blades
- An "Evolving" version can also be bought for 100 million Mesos
- [Lv. 100]


 [Emblems] Can be obtained from accepting a quest from
- [Lv. 100]
 [Cape] Rewarded from completing Mushroom Shrine Tales from Tengu
- Scaling stats considered slightly better than
 Tyrant Capes for the price
 - Bonus Stats can be freely rerolled by discarding the item and reobtaining it again from Tengu
- Scaling stats considered slightly better than
- [Lv. 100]
 [Cape] Purchasable using
  [Shadowdealer Coins] or
  [Magnus Coins] from Mayala
 - [Lv. 110]


 [Earrings / Ring / Pendant] Dropped by Hard Von Leon
Lv. 120+:
- [Lv. 120+]

 [ Lv. 80 Shoe / Lv. 80 Cape ] Dropped by Treglow / Victor / Velderoth and purchasable using
  [Shadowdealer Coins] from Mayala
- Not recommended because it is expensive to upgrade
- [Lv. 120+]

 [ Lv. 110 Shoe / Lv. 110 Cape ] Dropped by Magnus and purchassable using
  [Shadowdealer Coins] from Mayala
- Not recommended because it is expensive to upgrade
- [Lv. 120]
 [Ring] Reward from Lion King's Castle - Rose Garden
- Part of the Boss Accessory Set
- [Lv. 120]


 [Eclectic Gear] Dropped by monsters near Lv. 120
 - [Lv. 130]
 [Shoulder] Purchasable using
  [Yggdrasil Rune] or
  [Chaos Yggdrasil Rune] from Oko
 - [Lv. 130]


 [Muspell Gear] Dropped by monsters near Lv. 130
 - [Lv. 140]


 [Pensalir Gear] Obtained from fighting monsters above Lv. 140
 - [Lv. 140]


 [ Shoulder / Ring / Belt ] Dropped by Princess No
 - [Lv. 140]
 [Ring] Obtained from Accessory Crafting Profession
 - [Lv. 140]


 [ Hat, Overall, Shoes, Gloves, Cape, Belt, Shoulder ] Rewarded from completing Commerci Storyline
- Not to be confused with Sweetwater Gear
- [Lv. 150]


 [Japanese Gear] Dropped by Mori Ranmaru
 - [Lv. 150]
 [Shoulder] Bought with
  [Yggdrasil Rune] or
  [Chaos Yggdrasil Rune] from Oko
 - [Lv. 150]
 [Glove] Bought with
  [Shadowdealer Coins] or
  [Magnus Coins] from Mayala
 - [Lv. 150]


 [ Hat / Cape / Belt ] Dropped by Chaos Zakum
 - [Lv. 160]
 [Lupine Japanese Gear] Dropped by Akechi Mitsuhide or exchanged with
  [Mark of the Silver Wolf] from Kobayakawa Takakage
 - [Lv. 160]


 [Sweetwater Gear] Dropped by Commerci Voyage Bosses
 - [Lv. 160]

 [ Eye / Face ] Purchasable using
  [Commerci Denaro] from Javert
 - [Lv. 160]


 [ Medal / Android / Android ] Rewarded for completing Masteria Through Time Blockbuster
- Android has an NPC Vendor function
- Does not have a Heart provided
- [Lv. 170]


 [Lv. 125 Masteria Explorer Gear] Purchasable using
  [NLC Commemorative Coins] from Spindle
 - [Lv. 175+]
 [Lv. 150 Tyrant Capes] Dropped by Hard Magnus and purchasable using
  [Magnus Coins] from Mayala who also sells
  [Lv. 150 Tyrant Belts]
- Not recommended because it is expensive to upgrade
- [Lv. 180+]


 [Princess No Secondary] Obtained from exchanging
  [Fragments] dropped by Princess No
 - [Lv. 180]
 [Ring] Purchasable using
  [Shadowknight Coins] and Mesos from Fiona
- Not recommended because it is expensive to upgrade
- [Lv. 180+]


 [Cracked / Solid / Reinforced / Superior Gollux Accessories] Dropped by Gollux and purchasable using
  [Gollux Coins] from Lucia
 - [Lv. 180+]
 [Title] Rewarded by defeating each Chaos Root Abyss boss 10 times
 - [Lv. 200+]


 [Jade Boss Rings] Obtained from boss drops
Boss Armor:
- Considered a Boss Item for Flames/Bonus Stats
- Considered the main gear to strive because they are Boss Items
- [Hilla]


 [Lv. 120 Necromancer Gear]
 - [Von Leon (Hard Mode) +
 ]
] 


 [Lv. 130 Royal Von Leon Gear]
 - [Cygnus

 ]
] 


 [Lv. 140 Empress Gear]
 - [Chaos Root Abyss


 ]
] 


 [Lv. 150 CRA Gear]
 - [Damien / Lotus

 ]
] 


 [Lv. 160 AbsoLab Gear]
 - [Lucid / Will

 ]
] 


 [Lv. 200 Arcane Umbra Gear]
 - [Kalos
 ]
] 

 [Lv. 250 Eternal Knight Gear]
Boss Accessories:
- Part of the Boss Accessory Set
- Considered a Boss Item for Flames/Bonus Stats if applicable
- [Zakum]
 [ Lv. 110 Face ]
 - [Zakum]
 [ Lv. 100 Eye ]
 - [Pink Bean]
 [ Lv. 135 Eye ]
 - [Papulatus (Chaos Mode)]
 [ Lv. 145 Eye ]
 - [Horntail]
 [ Lv. 130 Earrings ]
 - [Horntail]
 [ Lv. 110 Ring ]
 - [Ifia (NPC)]
 [ Lv. 120 Ring ]
 - [Guardian Angel Slime]
 [ Lv. 160 Ring ]
 - [Horntail (Easy / Normal Mode)]
 [ Lv. 120 Pendant ]
 - [Horntail (Chaos Mode)]
 [ Lv. 120 Pendant ]
 - [Arkarium]
 [ Lv. 120 Pendant ]
 - [Arkarium]
 [ Lv. 140 Pendant ]
 - [Pink Bean]
 [ Lv. 140 Belt ]
 - [Zakum (Chaos Mode)]
 [ Lv. 150 Belt ]
 - [Magnus]
 [ Lv. 120 Shoulder ]
 - [Hilla]
 [ Lv. 0 Pocket Item ]
 - [Pink Bean]
 [ Lv. 140 Pocket Item ]
 - [Magnus]
 [ Lv. 130 Badge ]
Dawn Boss Accessories:
- Part of the Dawn Boss Accessory Set
- Considered a Boss Item for Flames/Bonus Stats if applicable
- [Verus Hilla / Chosen Seren]
 [ Lv. 140 Pendant ]
 - [Lucid / Will]
 [ Lv. 140 Face ]
 - [Gloom / Darknell]
 [ Lv. 160 Earrings ]
 - [Guardian Angel Slime]
 [ Lv. 160 Ring ]
- Ring is also part of the Boss Accessory set and requires using a special scroll
 [Conversion Scroll] from the Chief Slime to convert it into the Dawn Boss Accessory set
- Ring is also part of the Boss Accessory set and requires using a special scroll
Pitched Boss Accessories:
- Part of the Pitched Boss Accessory Set
- Considered a Boss Item for Flames/Bonus Stats if applicable
- Items here at very rare and hard to get
- [Lotus (Hard Mode)]

 [Lv. 120 Heart / Lv. 160 Face ]
- Heart is a time-limited item, time limit cannot be extended
- [Damien (Hard Mode)]
 [ Lv. 160 Eye ]
 - [Verus Hilla]
 [ Lv. 160 Pendant ]
 - [Will (Hard Mode)]


 [ Lv. 160 Pocket Item ]
 - [Lucid (Hard Mode)]
 [ Lv. 200 Belt ]
 - [Gloom]
 [ Lv. 200 Ring ]
 - [Darknell]
 [ Lv. 200 Earrings]
 - [Black Mage]
 [ Lv. 200 Badge ]
Progression towards Midgame
For info on upgrading and enhancing gear check out: https://www.grandislibrary.com/contents/upgrading-enhancing-equipment
 Spell Tracing in Interactive Worlds:
In Interactive Worlds, be sure to upgrade all your gear with at least 70% Spell Tracing so that you can start Star Forcing. On average, 70% Spell Tracing provides an optimal amount of stats compared to just 100% Spell Tracing your equipment
In Heroic Worlds, Spell Traces are unused and can be sold to NPCs for Mesos
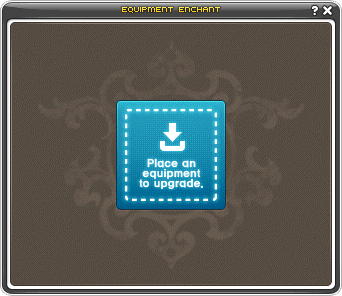
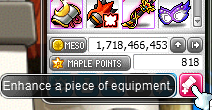
The Spell Trace and Star Force system is located in the Equipment Enchant UI by pressing "O" by default or through your inventory by pressing the red button with a hammer
Some ways to obtain Spell Traces are:
- Monster and Boss drops
- Inferno Wolf + Pollo/Frito Missions
Spell Trace Fever:

There are typically events where Spell Trace enhancements have an increased success rate. These are the best times to upgrade equipment you plan to invest a lot of time into. Unless you are planning to perfect a piece of equipment, you do not need to wait for this event to start Spell Tracing
50% Off Spell Tracing:
During Sunny Sundays, there are typically events where the number of Spell Traces required to upgrade is halved. This is a good time to use Spell Traces on Innocence Scrolls or Clean Slates
Star Forcing
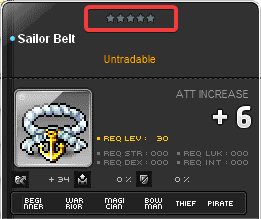
For more info on Star Forcing, check out the MapleStory Wiki Star Force Enhancement page
Star Force Enhancements cost Mesos and grants increased stats to an equipment upon success. On Interactive Worlds, before an equipment can be Star Force/enhance, all upgrade slots must be used. In Heroic Worlds, gear can be Star Forced/enhanced immediately since there are no upgrade slots
In early game, 12-stars on each item is suggested to keep at a comfortable pace. However, past 15 stars, equipment start to see a clear difference from equipment with fewer stars
During events, there are normally shops and rewards available to obtain  [Star Enhancement Scrolls] that sets an equipment's Star Force to a certain amount. For example, there are scrolls that upgrade an equipment immediately to 15 or 17 stars
30% Star Force Discount:
Occasionally on Sunny Sundays, Star Forcing is discounted by 30%. This is a good time to Star Force if you are trying to reach above 15-star. If you are just Star Forcing regularly to 12 stars, you do not need to wait for this to happen
5/10/15 Star Force 100%:
Occasionally on Sunny Sundays, Star Forcing to 5, 10, or 15 stars is a guaranteed success. This is a good time to reach 15-star but is not necessary to start Star Forcing your gear
1+1 Event:
Occasionally on Sunny Sundays, Star Forcing below 10 Stars grants 2 stars. This is useful for enhancing multiple items to 12-star, but is not necessary to start Star Forcing your gear
Shining Star Force Event:
Occasionally on Sunny Sundays, the 30% Discount and 5/10/15 Star event may overlap which provides the best opportunity to Star Force your gear especially to 17-star
Bonus Stats/Flames
For now don't worry too much about Bonus Stats and Rebirth Flames. If you do obtain a special rebirth flame, feel free to use it on anything or on Interactive Worlds, you can sell them (if tradeable)
Some nice stats to reroll into is your Main Stat, %All Stat, %Boss Damage or Attack/Magic Attack
Some reasons that make certain items better than others (or best-in-slot) include:
- Level Requirement of gear, higher the level, the better
- Level also affects the scaling of Bonus Stats
- Base Attack value & base stats
- Higher attack results in higher attack scaling on flames/bonus stats
- Amount of Star Force Enhancements (max. 25 stars)
- This is tied to the level requirement of the gear - higher level, more stars
- This is the most important factor
- Potential lines that can be obtained
- This is tied to the level requirement of the gear - higher level, better lines
- Ex. Higher level potentials provide more %Stat than lower level potentials
- Is a Boss Item or KMS Item
- These items can obtain higher tiers of Bonus Stats than non-KMS items
- Set bonus effect
Transfer Hammer
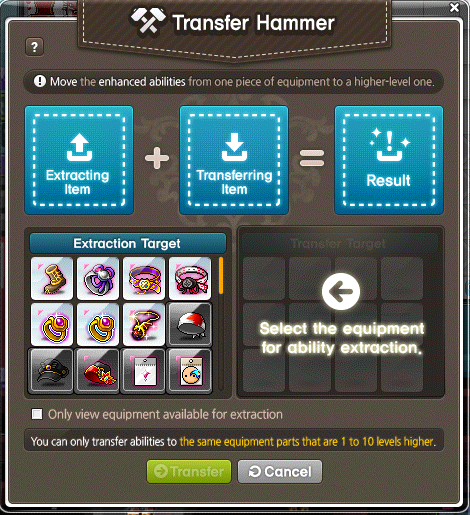
Transfer Hammer is a system that allows you to transfer Star Force, Potentials, Bonus Potentials, and Soul Weapon from one equipment to another (with restrictions). The following will not be transferred, Scrolled Stats and Bonus Stats. Additionally, you will lose one Star Force while transferring and any potentials above Epic will be dropped down to Epic Potential. You can only transfer equipment up to 10 levels apart of each other. For equipment below Lv. 119, you can transfer up to 20 levels apart
Some requirements for Transfer Hammering is that the piece of equipment must have at least 1 Star Force, cannot be Superior Gear (such as Tyrants) and must be the same equipment type (regardless of job group). Overalls can be counted towards both as a top or bottom and vice versa
In Interactive Worlds, any remaining upgrade slots will be filled by 100% Spell Traces for free. You can choose which stat the upgrades will be. I recommend that you already Upgrade/Spell Trace the Transferring Item first if you do not want the 100% Spell Trace stats

The Transfer Hammering UI is accessible from the Inventory UI by pressing the blue hammer icon. For more info on Transfer Hammer, check out: https://strategywiki.org/wiki/MapleStory/Transfer_Hammer
Epic Potential Gear and so on
In early game, all gear should be at least 9% Main Stat with Epic Potential. You will also want to working towards Unique Potential gear. Your main focus for this would be to try and get your Weapon, Secondary Weapon, and Emblem to unique first as their potentials can provide stats like %Attack/Magic Attack, %Ignore DEF and %Boss Damage unlike the rest of your gear. As a note, do not keep %Damage lines as they do not provide as much as a boost as the other potential lines do
As well, all equipment should have 3 lines of potential instead of 2. Otherwise, use  [Gold Potential Stamp] to unlock a 3rd line
Do not be afraid to use expiring  [Hard Cubes] as it's better to use them than waste it. As well, take that risk of rerolling your "okay" potentials for "great" potentials as they are easily regained
Some ways to obtain Epic Potential Scrolls are:
- [Heroic Worlds] Yu Garden shop
- [Interactive Worlds] Auction House
- Event Shops
- Elite Bosses
- Pollo/Fritto Missions + Inferno Wolf
- Legion System
Some ways to obtain Gold Potential Stamps are:
- [Interactive Worlds] Auction House
- Search for
 [Perfect Potential Stamp]
- Search for
- [Heroic Worlds] General Merchant Stores
- Sells
 [Silver Potential Stamp] instead that has a lower chance of success
- Sells
- Event Shops
- Elite Bosses
- Pollo/Fritto Missions + Inferno Wolf
- Legion System
Some ways to obtain Hard Cubes are:
- Crafting
- Harvesting from Mysterious Veins / Herbs
- Commerci Voyages
- Bosses
- Pollo/Frito Missions + Inferno Wolf
[ < 2k Main Stat] Earlygame Bosses
The amount of Main Stat listed is just a safe recommendation, your class may be able to defeat a boss with lower stat since there many other ways to improve a character besides Main Stat like Boost Nodes, %Boss Damage, or %Ignore DEF
There are also better options to test boss readiness such as attempting Practice Mode on a boss or Battle Analysis with a training dummy
An alternative is also to compare with Combat Power like this Google Doc
-
 Normal Zakum
- Source of Mesos in Heroic Worlds from:
 [Poisonic Weapons] that can be sold for Mesos
 - Source of
 Reward Points,
  [Soul Shard],
  [Mystical Cube],
  [Elixir],
  [Spell Trace], and
  [Intense Power Crystal]
 - Easy Mode and Above Rewards:
 [Zakum Helmet]
 - Normal Mode and Above Rewards:
 [Poisonic Weapons],
  [Condensed Power Crystal],
  [Aquatic Letter Eye],
  [Lv. 110 Rebirth Flame]
- Source of Mesos in Heroic Worlds from:
-
 Ursus
Ursus- Source of Mesos
- For more info on Ursus, check this out: https://strategywiki.org/wiki/MapleStory/Ursus
-
 Easy Papulatus
- Source of
 Reward Points,
  [Soul Shard],
  [Mystical Cube],
  [Elixir],
  [Spell Trace], and
  [Intense Power Crystal]
- Source of
-
 Easy Magnus
- Source of
 Reward Points,
  [Soul Shard],
  [Mystical Cube],
  [Elixir],
  [Spell Trace], and
  [Intense Power Crystal]
 - Easy Mode and Above Rewards:
 [Superior Belt],
  [Superior Cape],
  [Crystal Ventus Badge],
  [Royal Black Metal Shoulder],
  [Kaiserion],
  [Lv. 110 Rebirth Flame],
  [Shadowdealer Coin]
- Source of
-
 Normal Hilla
- Source of
 Reward Points,
  [Soul Shard],
  [Mystical Cube],
  [Elixir],
  [Spell Trace], and
  [Intense Power Crystal]
 - Normal Mode and Above Rewards:
 [Stone of Eternal Life],
  [Lv. 120 Necromancer Gear],
  [Lv. 120 Rebirth Flame] ,
  [Pet Box]
- Source of
-
 OMNI-CLN
- Source of
 Reward Points,
  [Mystical Cube],
  [Elixir],
  [Spell Trace], and
  [Intense Power Crystal]
 - Normal Mode Rewards:
 [OMNI-CLN Component],
  [OMNI-CLN Vacuum],
  [Lv. 110 Rebirth Flame]
- Source of
[ > 3k Main Stat] Earlygame Bosses
-
 Easy/Normal Gollux:
- Source of
 Reward Points,
  [Mystical Cube],
  [Power Elixir], and
  [Spell Trace]
 - Main Rewards:
 [Gollux Penny] ,


 [Cracked Gollux Accessories],


 [Solid Gollux Accessories (Normal and above)]
 - Gollux Pennies
 can be used to buy items from Randolf and Mountain Murmur
- Source of
-
 Normal Root Abyss:
- Source of
 Reward Points,
  [Soul Shard],
  [Mystical Cube],
  [Elixir] and
  [Intense Power Crystal]
 - Normal mode and Above Rewards:
 [Yggdrasil Rune] ,


 [Chair]
- Source of
-
 Easy/Normal/Chaos Horntail
- Source of
 Reward Points,
  [Mystical Cube],
  [Elixir],
  [(Chaos Only) Power Elixir],
  [Spell Trace], and
  [Intense Power Crystal]
 - Easy Mode and Above Rewards:
 [Silver Blossom Ring],
  [Dea Sidus Earrings],
  [Horntail Necklace],
  [Elixir],
  [Lv. 120 Rebirth Flame]
 - Normal Mode and Above Rewards:
 [Wealth Aquisition Potion Recipe]
 - Chaos Mode Only Rewards:
 [Chaos Horntail Necklace],
  [Power Elixir] ,
  [Horntail Fountain]
- Source of
-
 Easy/Normal/Hard Von Leon
- Source of
 Reward Points,
  [Soul Shard],
  [Mystical Cube],
  [Elixir],
  [Spell Trace], and
  [Intense Power Crystal]
 - Easy/Normal Mode and Above Rewards:
 [Elixir],
  [Lv. 120 Rebirth Flame],
  [Soul Shard],
  [Mystical Cube] ,
  [Von Leon Gear Currency] ,
  [Intense Power Crystal]
 - Hard Mode and Above Rewards:

 [Lv. 130 Von Leon Gear],

 [Ifia Accessories],
  [Lion Ice Sculpture]
 -
 exchange for
 [Lv. 130 Von Leon Gear]
- Source of
-
 Normal/Hard Mori Ranmaru
- Hard requires much more range than Normal (close to 10k Main Stat) however grants a lot of EXP when defeated
- Source of
 Reward Points,
  [Mystical Cube],
  [Elixir],
  [(Hard Only) Power Elixir],
  [Spell Trace], and
  [Intense Power Crystal]
 - Normal Mode and Above Rewards:
 [Lv. 120 Gear] ,
  [Lv. 120 Rebirth Flame],
  [(Heroic World Only) Powerful Rebirth Flame],
  [(Heroic World Only) Eternal Rebirth Flame]
 - Hard Mode Only Rewards: ,
 [Japanese Armor],
  [Lv. 130 Rebirth Flame]
-
 Normal Pink Bean
- Source of
 Reward Points,
  [Soul Shard],
  [Mystical Cube],
  [Power Elixir],
  [Spell Trace], and
  [Intense Power Crystal]
 - Normal Mode and Above Rewards:
 [Black Bean Mark],
  [Golden Clover Belt],
  [Pink Holy Cup],
  [Lv. 120 Rebirth Flame]
- Source of
[ > 5k Main Stat] Earlygame Bosses
-
 Easy Cygnus
- Source of
 Reward Points,
  [Soul Shard],
  [Mystical Cube],
  [Power Elixir],
  [Spell Trace], and
  [Intense Power Crystal]
 - Easy Mode and Above Rewards:
 [Lv. 140 Rebirth Flame] ,
 [Empress Gear Fragment]
 exchange for
 [Lv. 140 Empress Gear]
- Source of
-
 Hard Hilla
- Source of
 Reward Points,
  [Soul Shard],
  [Mystical Cube],
  [Power Elixir],
  [Spell Trace], and
  [Intense Power Crystal]
 - Hard Mode Only Rewards:
 [Will O' the Wisps],
  [Hilla Obelisk Floor Lamp]
- Source of
-
 Easy/Normal Arkarium
- Source of
 Reward Points,
  [Soul Shard],
  [Mystical Cube],
  [Elixir],
  [(Normal Only) Power Elixir],
  [Spell Trace], and
  [Intense Power Crystal]
 - Easy mode and Above Rewards:
 [Mechanator Pendant],
  [Lv. 130 Rebirth Flame] ,
  [Primal Essence]
 - Normal mode Only Rewards:
 [Dominator Pendant],
  [Arkarium Statue]
 - Ability to clear Arkarium early game will depend on your class, for example, does your class have a bind or iFrame?
- Source of
[ > 8k Main Stat] Earlygame Bosses
-
 Normal Cygnus
- Source of
 Reward Points,
  [Soul Shard],
  [Mystical Cube],
  [Power Elixir],
  [Spell Trace], and
  [Intense Power Crystal]
 - Normal Mode Only Rewards:
 [Empress Shoulder],

 [Shield Recipes] ,
  [Plush Cygnus Shelf]
 exchange for
 [Lv. 140 Empress Gear]
- Source of
-
 Chaos Zakum
- Source of Mesos in Heroic Worlds from:
 [Poisonic Weapons] that can be sold for Mesos
 - Source of
 Reward Points,
  [Soul Shard],
  [Mystical Cube],
  [Power Elixir],
  [Spell Trace], and
  [Intense Power Crystal]
 - Chaos Mode Only Rewards:
 [Chaos Zakum Helmet],
  [Enraged Zakum Helmet],
  [Enraged Zakum Cape],
  [Enraged Zakum Belt],
  [Zakum Hand Table]
- Source of Mesos in Heroic Worlds from:
 Normal Papulatus
- Source of
 Reward Points,
  [Soul Shard],
  [Mystical Cube],
  [Power Elixir],
  [Spell Trace], and
  [Intense Power Crystal]
 - Normal Mode and Above Rewards:
 [Papulatus Clock Chair]
- Source of
-
 Normal Magnus
- Source of
 Reward Points,
  [Soul Shard],
  [Mystical Cube],
  [Power Elixir],
  [Spell Trace], and
  [Intense Power Crystal]
 - Normal Mode and Above Rewards:
 [Superior Nova Cape]
- Source of
[ > 12k Main Stat] Earlygame Bosses
-
 Chaos Pink Bean
- Source of
 Reward Points,
  [Soul Shard],
  [Mystical Cube],
  [Power Elixir],
  [Spell Trace], and
  [Intense Power Crystal]
 - Chaos Mode Only Rewards:

 [Chaos Pink Bean Set],
 [Black Bean Set],
  [Powerful Rebirth Flame],
  [Eternal Rebirth Flame],
  [Pink Bean Armchair]
- Source of
-
 Princess No:
- Source of
 Reward Points,
  [Mystical Cube],
  [Power Elixir],
  [Spell Trace], and
  [Intense Power Crystal]
 - Main Rewards:
 [Secondary Weapon Fragment],

 [ Shoulder / Ring / Belt ] ,
  [Princess No Chair],
  [Princess No Effect Coupon],
  [Lv. 140 Rebirth Flame]
  can be used to redeem the best
 [Secondary Weapons] in the game
- Source of
-
 Hard Gollux:
- Source of
 Reward Points,
  [Mystical Cube],
  [Power Elixir], and
  [Spell Trace]
 - Main Rewards:
 [Gollux Coins],
 [Reinforced/Solid/Cracked Gollux Earrings & Belt]
 - Gollux Coins
 can be used to buy items from Randolf and Mountain Murmur
- Source of
[ > 14k Main Stat] Midgame Bosses
Recommended to have at least >%90 IED and >200% Boss Damage for bosses beyond this point
-
 Chaos Root Abyss:
- Source of
 Reward Points,
  [Soul Shard],
  [Mystical Cube],
  [Power Elixir],
  [Spell Trace], and
  [Intense Power Crystal]
 - Chaos Mode Only Rewards:


 [Chaos Hat],


 [CRA Gear Fragment],
  [Chaos Yggdrasil Rune],


 [Chair] ,


 [Furniture]
 - These fragments


 exchange for
 [Lv. 150 Root Abyss Gear]
- Source of
-
 Hard Magnus
- Source of
 Reward Points,
  [Soul Shard],
  [Mystical Cube],
  [Power Elixir],
  [Spell Trace], and
  [Intense Power Crystal]
 - Hard Mode Only Rewards:
 [Superior Tyrant Cape],
  [Superior Nova Boots],
  [Cursed Kaiserium],
  [Lv. 150 Rebirth Flame] ,
  [Magnus Coin] ,
  [Magnus Horn Throne]
- Source of
 Akechi Mitsuhide:
- Source of
 Reward Points,
  [Mystical Cube],
  [(Interactive Worlds Only) Bonus Mystical Cube],
  [Power Elixir],
  [Spell Trace], and
  [Intense Power Crystal]
 - Main Rewards:

 [Japanese Wolf Weapons],
  [Mark of the Silver Wolf],
  [Sparkling Blue Star Potion],
  [Sparkling Red Star Potion],
  [Small EXP Accumulation Potion],
  [50% EXP Coupon Voucher],
  [Powerful Rebirth Flame],
  [Mystical Cube],
  [Power Elixir],
  [Intense Power Crystal],
  [(Interactive Worlds Only) Bonus Mystical Cube]
  Coin is usage to exchange for Japanese Wolf Weapons from Kobayakawa Takakage
- Source of
[ > 28k Main Stat] Midgame Bosses
-
 Easy Lucid
- Source of
 Reward Points,
  [Soul Shard],
  [Mystical Cube],
  [(Interactive Worlds Only) Bonus Mystical Cube],
  [Power Elixir],
  [Spell Trace], and
  [Intense Power Crystal]
 - Easy Mode and Above Rewards:
 [Sparkling Blue Star Potion],
  [Sparkling Red Star Potion],
  [Small EXP Accumulation Potion],
  [Lv. 150 Rebirth Flame] ,
  [Powerful Rebirth Flame],
  [Eternal Rebirth Flame],
  [50% EXP Coupon Voucher],
  [Soul Shard]
- Source of
-
 Easy Will
- Source of
 Reward Points,
  [Soul Shard],
  [Mystical Cube],
  [(Interactive Worlds Only) Bonus Mystical Cube],
  [Power Elixir],
  [Spell Trace], and
  [Intense Power Crystal]
 - Easy Mode and Above Rewards:
 [Sparkling Blue Star Potion],
  [Sparkling Red Star Potion],
  [Small EXP Accumulation Potion],
  [Lv. 150 Rebirth Flame] ,
  [Powerful Rebirth Flame],
  [Eternal Rebirth Flame],
  [50% EXP Coupon Voucher],
  [Intense Power Crystal]
- Source of
 Normal Guardian Angel Slime
- Source of
 Reward Points,
  [(Interactive Worlds Only) Bonus Mystical Cube],
  [Power Elixir],
  [Spell Trace], and
  [Intense Power Crystal]
 - Normal Mode and Above Rewards:
 [Guardian Angel Ring],
  [Sparkling Blue Star Potion],
  [Sparkling Red Star Potion],
  [Small EXP Accumulation Potion],
  [Rebirth Flame Lv. 150],
  [Powerful Rebirth Flame],
  [Eternal Rebirth Flame],
  [50% EXP Coupon Voucher],
  [Intense Power Crystal]
- Source of
Tier I Endgame Bosses
Bosses beyond this point are not meant to be soloable and are more party-oriented bosses. As well, beyond this point, bosses will be separated by tiers as there is no good recommended stat indicators for the reasons mentioned earlier.
-
 Normal Lucid
- Source of
 Reward Points,
  [Soul Shard],
  [Mystical Cube],
  [(Interactive Worlds Only) Bonus Mystical Cube],
  [Power Elixir],
  [Spell Trace], and
  [Intense Power Crystal]
 - Normal Mode and Above Rewards:
 [Butterfly Droplet Stone],
  [Twilight Mark]
- Source of
-
 Normal Will
- Source of
 Reward Points,
  [Soul Shard],
  [Mystical Cube],
  [(Interactive Worlds Only) Bonus Mystical Cube],
  [Power Elixir],
  [Spell Trace], and
  [Intense Power Crystal]
 - Normal Mode and Above Rewards:
 [Stone Cobweb Droplet],
  [Twilight Mark]
- Source of
 Normal Gloom
- Source of
 Reward Points,
  [Mystical Cube],
  [(Interactive Worlds Only) Bonus Mystical Cube],
  [Power Elixir],
  [Spell Trace], and
  [Intense Power Crystal]
 - Normal Mode and Above Rewards:
 [Estella Earrings],
  [Spark of Determination],
  [Sparkling Blue Star Potion],
  [Sparkling Red Star Potion],
  [Small EXP Accumulation Potion],
  [Lv. 150 Rebirth Flame] ,
  [Powerful Rebirth Flame],
  [Eternal Rebirth Flame],
  [Black Rebirth Flame],
  [50% EXP Coupon Voucher]
- Source of
 Normal Darknell
- Source of
 Reward Points,
  [Soul Shard],
  [Mystical Cube],
  [(Interactive Worlds Only) Bonus Mystical Cube],
  [Power Elixir],
  [Spell Trace], and
  [Intense Power Crystal]
 - Normal Mode and Above Rewards:
 [Estella Earrings],
  [Spark of Determination] ,
  [Sparkling Blue Star Potion],
  [Sparkling Red Star Potion],
  [Small EXP Accumulation Potion],
  [Power Elixir] ,
  [Lv. 150 Rebirth Flame] ,
  [Powerful Rebirth Flame],
  [Eternal Rebirth Flame],
  [Black Rebirth Flame],
  [50% EXP Coupon Voucher],
  [Soul Shard] ,
  [Intense Power Crystal] ,
  [Spell Trace] ,
  [(Interactive Worlds Only) Bonus Mystical Cube]
- Source of
Tier II Endgame Bosses
 Hard Lotus
- Source of
 Reward Points,
  [Soul Shard],
  [Mystical Cube],
  [(Interactive Worlds Only) Bonus Mystical Cube],
  [Power Elixir],
  [Spell Trace], and
  [Intense Power Crystal]
 - Hard Mode Only Rewards:
 [AbsoLab Armor/Weapon Box],
  [Damaged Black Heart],
  [Lotusroid Android],
  [Beserked Face Accessory],
  [Orchid's Plush Bunny],
  [Black Rebirth Flame],
  [Eternal Rebirth Flame],
  [(Interactive Worlds Only) Incredible Chaos Scroll of Goodness 60%],
  [(Interactive Worlds Only) Scroll - Accessory Coupon],
  [(Interactive Worlds Only) Unrelenting Flame],
  [(Interactive Worlds Only) Forever Unrelenting Flame],
  [(Interactive Worlds Only) Forever Unrelenting Black Flame]
- Source of
 Hard Damien
- Source of
 Reward Points,
  [Soul Shard],
  [Mystical Cube],
  [(Interactive Worlds Only) Bonus Mystical Cube],
  [Power Elixir],
  [Spell Trace], and
  [Intense Power Crystal]
 - Hard Mode Only Rewards:
 [Damienroid Android],
  [Magic Eyepatch],
  [AbsoLab Armor/Weapon Box],
  [Damien's Sword],
  [Black Rebirth Flame],
  [Eternal Rebirth Flame],
  [(Interactive Worlds Only) Incredible Chaos Scroll of Goodness 60%],
  [(Interactive Worlds Only) Scroll - Accessory Coupon],
  [(Interactive Worlds Only) Unrelenting Flame],
  [(Interactive Worlds Only) Forever Unrelenting Flame],
  [(Interactive Worlds Only) Forever Unrelenting Black Flame]
- Source of
 Hard Lucid
- Source of
 Reward Points,
  [Soul Shard],
  [Mystical Cube],
  [(Interactive Worlds Only) Bonus Mystical Cube],
  [Power Elixir],
  [Spell Trace], and
  [Intense Power Crystal]
 - Hard Mode Only Rewards:
 [Lucidroid],
  [Dreamy Belt],
  [Arcane Umbra Armor/Weapon Box],
  [Black Rebirth Flame],
  [Lucid's Canopy Bed],
  [(Interactive Worlds Only) Incredible Chaos Scroll of Goodness 60%],
  [(Interactive Worlds Only) Scroll - Accessory Coupon],
  [(Interactive Worlds Only) Unrelenting Flame],
  [(Interactive Worlds Only) Forever Unrelenting Flame],
  [(Interactive Worlds Only) Forever Unrelenting Black Flame]
- Source of
 Hard Will
- Source of
 Reward Points,
  [Soul Shard],
  [Mystical Cube],
  [(Interactive Worlds Only) Bonus Mystical Cube],
  [Power Elixir],
  [Spell Trace], and
  [Intense Power Crystal]
 - Hard Mode Only Rewards:
 [Will's Cursed Spellbook Selection Box],
  [Arcane Umbra Armor/Weapon Box],
  [Mirror World Nodestone],
  [Black Rebirth Flame],
  [Will's Web Swing Chair],
  [(Interactive Worlds Only) Incredible Chaos Scroll of Goodness 60%],
  [(Interactive Worlds Only) Scroll - Accessory Coupon],
  [(Interactive Worlds Only) Unrelenting Flame],
  [(Interactive Worlds Only) Forever Unrelenting Flame],
  [(Interactive Worlds Only) Forever Unrelenting Black Flame]
- Source of
 Normal Verus Hilla
- Source of
 Reward Points,
  [Soul Shard],
  [Mystical Cube],
  [(Interactive Worlds Only) Bonus Mystical Cube],
  [Power Elixir],
  [Spell Trace], and
  [Intense Power Crystal]
 - Normal Mode and Above Rewards:
 [Daybreak Pendant],
  [Arcane Umbra Armor/Weapon Box],
  [Sparkling Blue Star Potion],
  [Sparkling Red Star Potion],
  [Small EXP Accumulation Potion],
  [Lv. 150 Rebirth Flame] ,
  [Powerful Rebirth Flame],
  [Eternal Rebirth Flame],
  [Black Rebirth Flame],
  [50% EXP Coupon Voucher],
  [(Interactive Worlds Only) Incredible Chaos Scroll of Goodness 60%]
- Source of
Tier III Endgame Bosses
 Chaos Gloom
- Source of
 Reward Points,
  [Mystical Cube],
  [(Interactive Worlds Only) Bonus Mystical Cube],
  [Power Elixir] and
  [Intense Power Crystal]
 - Chaos Mode Only Rewards:
 [Endless Terror],
  [Gloom Dark Bean Bag],
  [Primal Essence],
  [(Interactive Worlds Only) Incredible Chaos Scroll of Goodness 60%],
  [(Interactive Worlds Only) Premium Scroll - Accessory Coupon],
  [(Interactive Worlds Only) Premium Scroll - Pet Equipment Coupon],
  [(Interactive Worlds Only) Magical Scroll - Weapon Coupon],
  [(Interactive Worlds Only) Unrelenting Flame],
  [(Interactive Worlds Only) Forever Unrelenting Flame],
  [(Interactive Worlds Only) Forever Unrelenting Black Flame]
- Source of
 Hard Verus Hilla
- Source of
 Reward Points,
  [Soul Shard],
  [Mystical Cube],
  [(Interactive Worlds Only) Bonus Mystical Cube],
  [Power Elixir],
  [Spell Trace], and
  [Intense Power Crystal]
 - Hard Mode Only Rewards:
 [Source of Suffering],
  [Shadow of Annihilation],
  [Soul Candle],
  [Primal Essence],
  [(Interactive Worlds Only) Premium Scroll - Accessory Coupon],
  [(Interactive Worlds Only) Premium Scroll - Pet Equipment Coupon],
  [(Interactive Worlds Only) Magical Scroll - Weapon Coupon],
  [(Interactive Worlds Only) Unrelenting Flame],
  [(Interactive Worlds Only) Forever Unrelenting Flame],
  [(Interactive Worlds Only) Forever Unrelenting Black Flame]
- Source of
 Hard Darknell
- Source of
 Reward Points,
  [Soul Shard],
  [Mystical Cube],
  [(Interactive Worlds Only) Bonus Mystical Cube],
  [Power Elixir],
  [Spell Trace], and
  [Intense Power Crystal]
 - Hard Mode Only Rewards:
 [Commanding Force Earrings],
  [Arcane Umbra Armor/Weapon Box],
  [Darknell's Helmet Decoration],
  [Primal Essence],
  [(Interactive Worlds Only) Premium Scroll - Accessory Coupon],
  [(Interactive Worlds Only) Premium Scroll - Pet Equipment Coupon],
  [(Interactive Worlds Only) Magical Scroll - Weapon Coupon],
  [(Interactive Worlds Only) Incredible Chaos Scroll of Goodness 60%],
  [(Interactive Worlds Only) Unrelenting Flame],
  [(Interactive Worlds Only) Forever Unrelenting Flame],
  [(Interactive Worlds Only) Forever Unrelenting Black Flame]
- Source of
 Chaos Guardian Angel Slime
- Source of
 Reward Points,
  [(Interactive Worlds Only) Bonus Mystical Cube],
  [Power Elixir],
  [Spell Trace], and
  [Intense Power Crystal]
 - Main Rewards:
 [Guardian Angel Ring],
  [Black Rebirth Flame],
  [Primal Essence],
  [Sparkling Blue Star Potion],
  [Sparkling Red Star Potion],
  [Small EXP Accumulation Potion],
  [Rebirth Flame Lv. 150],
  [50% EXP Coupon Voucher],
  [Powerful Rebirth Flame],
  [Eternal Rebirth Flame]
- Source of
Tier IV Endgame Bosses
 Black Mage
- Source of
 Reward Points,
  [Mystical Cube],
  [(Interactive Worlds Only) Bonus Mystical Cube],
  [Power Elixir],
  [Spell Trace], and
  [Intense Power Crystal]
 - Main Rewards:
 [Sealed Genesis Weapon Box],
  [Genesis Badge],
  [Arcane Umbra Armor/Weapon Box],
  [Black Mage's Mirror],
  [Primal Essence],
  [Sparkling Blue Star Potion],
  [Sparkling Red Star Potion],
  [Small EXP Accumulation Potion],
  [Lv. 150 Rebirth Flame] ,
  [Powerful Rebirth Flame],
  [Eternal Rebirth Flame],
  [Black Rebirth Flame],
  [50% EXP Coupon Voucher],
  [(Interactive Worlds Only) Premium Scroll - Accessory Coupon],
  [(Interactive Worlds Only) Premium Scroll - Pet Equipment Coupon],
  [(Interactive Worlds Only) Magical Scroll - Weapon Coupon],
  [(Interactive Worlds Only) Incredible Chaos Scroll of Goodness 60%],
  [(Interactive Worlds Only) Unrelenting Flame],
  [(Interactive Worlds Only) Forever Unrelenting Flame],
  [(Interactive Worlds Only) Forever Unrelenting Black Flame]
- Source of
 Seren
Seren- Source of
 Reward Points,
  [Mystical Cube],
  [(Interactive Worlds Only) Bonus Mystical Cube],
  [Power Elixir],
  [Spell Trace], and
  [Intense Power Crystal]
 - Main Rewards:
 [Mitra's Rage Selection Box],
  [Mitra's Nodestone],
  [Daybreak Pendant],
  [Primal Essence],
  [Sparkling Blue Star Potion],
  [Sparkling Red Star Potion],
  [Small EXP Accumulation Potion],
  [Lv. 150 Rebirth Flame] ,
  [Powerful Rebirth Flame],
  [Eternal Rebirth Flame],
  [Black Rebirth Flame],
  [50% EXP Coupon Voucher],
  [(Interactive Worlds Only) Premium Scroll - Accessory Coupon],
  [(Interactive Worlds Only) Premium Scroll - Pet Equipment Coupon],
  [(Interactive Worlds Only) Magical Scroll - Weapon Coupon],
  [(Interactive Worlds Only) Incredible Chaos Scroll of Goodness 60%],
  [(Interactive Worlds Only) Unrelenting Flame],
  [(Interactive Worlds Only) Forever Unrelenting Flame],
  [(Interactive Worlds Only) Forever Unrelenting Black Flame]
- Source of
 Kalos
Kalos- Source of
 Reward Points,
  [Soul Shard],
  [Mystical Cube],
  [(Interactive Worlds Only) Bonus Mystical Cube],
  [Power Elixir],
  [Spell Trace], and
  [Intense Power Crystal]
 - Main Rewards:
 [Kalos's Residual Determination],
  [Kalos Ceiling Fan],
  [Primal Essence],
  [Sparkling Blue Star Potion],
  [Sparkling Red Star Potion],
  [Small EXP Accumulation Potion],
  [Lv. 150 Rebirth Flame] ,
  [Powerful Rebirth Flame],
  [Eternal Rebirth Flame],
  [Black Rebirth Flame],
  [50% EXP Coupon Voucher],
  [(Interactive Worlds Only) Premium Scroll - Accessory Coupon],
  [(Interactive Worlds Only) Premium Scroll - Pet Equipment Coupon],
  [(Interactive Worlds Only) Magical Scroll - Weapon Coupon],
  [(Interactive Worlds Only) Incredible Chaos Scroll of Goodness 60%],
  [(Interactive Worlds Only) Unrelenting Flame],
  [(Interactive Worlds Only) Forever Unrelenting Flame],
  [(Interactive Worlds Only) Forever Unrelenting Black Flame]
  [Kalos's Residual Determination] is used to redeem

 [Eternal Gear]
- Source of
Daily / Weekly Quests
Daily and Weekly Quests are primarily unlocked after Lv. 200. Characters pre-200 should focus on levelling up first before worring about these quests
Dailies
 [Lv. Any] MAPLE Daily Gift: A free daily check-in gift available after defeating 300 enemies near your level
- There are a total of 28 check-ins and check-ins reset monthly
- Upon defeating 300 enemies, a notification will pop up, or you can open the MAPLE Daily Gift UI to claim gift
- To open the MAPLE Daily Gift UI, click the green icon with a check mark on the bottom right menu bar and then click on "Daily Gift"
 [Lv. 105+] Monster Park: Completing Monster Park rewards EXP and
  [Monster Park Commemorative Coins] for exchanging items
- The
 coins can be exchanged for potion buffs


 that can be stored in storage which are useful training and bossing
 - Completing Monster Park 77 times for each day of the week will reward a
 [Medal] that provides +10% Ignore Enemy Defense
- The
 [Lv. 105+] Maple Tour: Completing Maple Tour rewards Mesos and
  [Maple Tour Coins] for exchanging items
- Mesos are accumulated and can be retrieved 7 days later for the full amount or retrieved earlier for half the amount
 [Lv. 140+] [Heroic World] The Far East (Yu Garden): Completing The Far East storyline unlocks Daily Quests
- Main Reward:
 [Epic Potential Scrolls] in Heroic Worlds only
- Main Reward:
 [Lv. 200+] Arcane River - Vanishing Journey: Completing the Vanishing Journey storyline unlocks Daily Quests
- Main Reward:
 [Arcane Symbols]
- Main Reward:
 [Lv. 210+] Arcane River - Chu Chu Island: Completing the Chu Chu Island storyline unlocks Daily Quests
- Main Reward:
 [Arcane Symbols]
- Main Reward:
 [Lv. 220+] Arcane River - Lachelein: Completing the Lachelein storyline unlocks Daily Quests
- Main Rewards:
 [Arcane Symbols]
- Main Rewards:
 [Lv. 225+] Arcane River - Arcana: Completing the Arcana storyline unlocks Daily Quests
- Main Rewards:
 [Arcane Symbols]
- Main Rewards:
 [Lv. 230+] Arcane River - Morass: Completing the Morass storyline unlocks Daily Quests
- Main Rewards:
 [Arcane Symbols]
- Main Rewards:
 [Lv. 235+] Arcane River - Esfera: Completing the Esfera storyline unlocks Daily Quests
- Main Rewards:
 [Arcane Symbols]
- Main Rewards:
 [Lv. 245+] Tenebris - Moonbridge: Completing the Moonbridge storyline unlocks Daily Quests
- More daily quests are available after completing the Labyrinth of Suffering and Limina storylines
- Main Rewards:
 [Spark of Determination]
Weeklies
 [Lv. 190+] Scrapyard: No pre-quests
- Weekly Quests reward
 [Diffusion-Line Energy Core (Grade A)] that are used to create
  [AbsoLab Coins] to buy


 [(Shoe/Glove/Cape/Weapon) AbsoLab Gear]
 - Enemies in this area also drop

- Weekly Quests reward
 [Lv. 190+] Dark World Tree: No pre-quests
- Weekly Quests reward
 [Faint Stigma Spirit Stone] that are used to create
  [Stigma Coins] to buy for


 [(Hat/Overall/Shoulder/Weapon) AbsoLab Gear]
 - Monsters in this area also drop

- Weekly Quests reward
 [Lv. 200+] Arcane River - Vanishing Journey: Completing the Vanishing Journey Daily twice rewards Nodestones
- Main Reward:
 [Nodestones]
- Main Reward:
 [Lv. 200+] [Party Quest] Erda Spectrum: Unlocked after completing the Vanishing Journey storyline. Requires 1-3 party members to enter. There are 2 stages and the objective to help Nina conduct research
- Main Reward:
 [Arcane Symbols]
- Main Reward:
 [Lv. 210+] [Party Quest] Hungry Muto: Unlocked after completing the Chu Chu Island storyline. Requires 1-4 party members to enter. The main objective is to gather ingredients from monsters to create dishes to feed Muto
- Main Reward:
 [Arcane Symbols]
- Main Reward:
 [Lv. 220+] Midnight Chaser: This activity can only be entered alone. The objective is to locate objects scattered around a series of maps
- Main Rewards:
 [Arcane Symbols]
- Main Rewards:
 [Lv. 225+] Spirit Savior: This activity can only be entered alone. The objective is to save Rock Spirits that have been kidnapped while avoiding an evil spirit that chases you
- Main Rewards:
 [Arcane Symbols]
- Main Rewards:
 [Lv. 230+] Ranheim Defense: This activity can only be entered alone. The objective is to defend a pillar on the middle of the map from invading enemies
- Main Rewards:
 [Arcane Symbols]
- Main Rewards:
 [Lv. 235+] Esfera Guardian: This activity can only be entered alone. The objective is to destroy dimensional gates using a turret to aim and shoot
- Main Rewards:
 [Arcane Symbols]
- Main Rewards:
Optional:
Quests here have rewards that are not required for most players
 [Lv. 140+] [Daily] Commerci Voyages: Unlocked after reaching the town of San Commerci. Completing trade voyages reward
  [Commerci Denaro]
- Denaros are used to buy
 [Sweetwater Monocle] and
  [Sweetwater Tattoo] from Javert
- Denaros are used to buy
 [Lv. 170+] [Weekly] Kritias: Unlocked after completing the Kritias storyline
- Weekly Quests reward
 [Anti-magic Stone] and
  [Anti-magic Stone Piece] that are used to create
  [Kritias Commemorative Coins] to buy
  [Tyrant Gloves] and
 [Weekly Boss Reset Tickets]
 - For more info on Kritias, check out: https://dexless.com/guides/kritias-everything-you-need-to-know-about-it.217/
- Weekly Quests reward
 [Lv. 180+] [Daily] Crimsonwood - Phantom Forest: Completing the Phantom Forest storyline unlocks Daily Quests that reward
  [Raven Ninja Coins] and
  [Shadowknight Coins] to buy items from Mo and Fiona in the Phantom Forest
- Main Rewards:


 [Masteria's Legacy Gear],

 [iTCG Gear],
  [Balanced Fury],
  [Crystal Ilbis]
- Main Rewards:
- [Daily] Legion System: Completing quests reward
 [Legion Coins]
Maple Planner
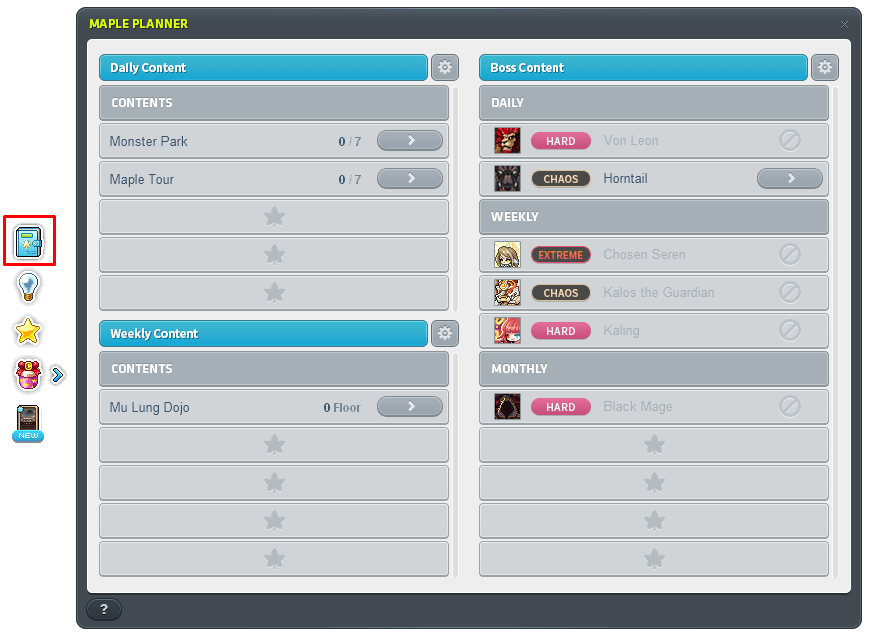
The Maple Planner provides a convenient way to organize your daily and weekly content. By pressing on the Gear icon beside each category, content can be added to the Maple Planner. Content that is added like bosses can be directly teleported. Content that is added like daily or weekly quests can be accepted and completed directly
The Maple Planner can be accessed by clicking the Book icon on the left-side of the screen or by assigning a Key Slot
Training Maps
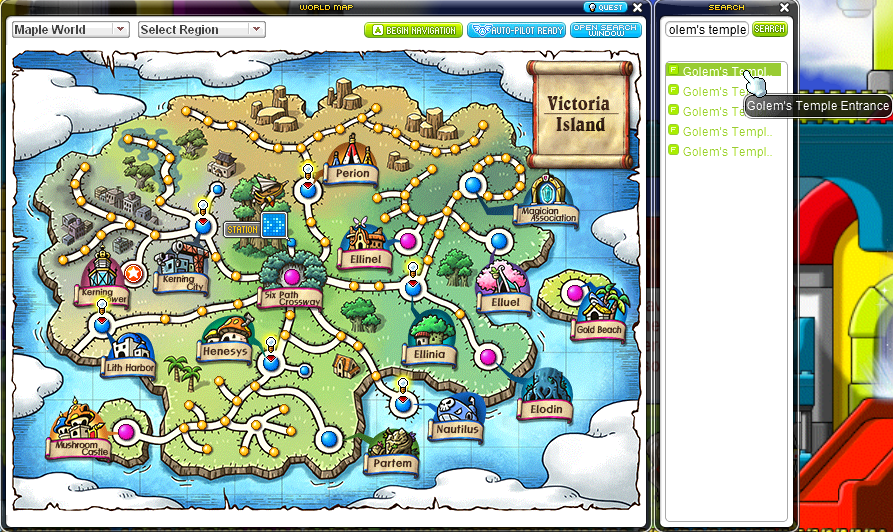
Below is a list of suggested training maps. To find out how to navigate to a specific map, open your World Map (W by default) and search for the desired map on the right-hand side. Clicking on an entry will direct you to the map and start blinking
Special thanks to Proof#8868 for the list of training maps. Click here for a Google Sheets version of the training maps
*Search function may not be 100% reliable
Theme Dungeons
Theme Dungeons are storylines tied to areas below Lv. 200. Typcially, completing a theme dungeon rewards Mesos and equipment. In the next section, Quest Content, the starting quest for each theme dungeon will be listed
Above Lv. 200, area quests are referred to as simply storylines or questlines. The main story above Lv. 200 takes place in the Arcane River and continent of Grandis. Within these two areas are sub-areas with their own storylines and quests
-
 [Lv. 30 - 59] Ellinel Fairy Academy
- Main Rewards:
 [1 mil Mesos],
  [Spell Traces],
  [Cape],
  [Glove],
  [Eye Accessory],
  [Medal]
- Main Rewards:
 [Lv. 30 - 59] Gold Beach Resort
- Main Rewards:
 [1 mil Mesos],
  [Spell Traces],
  [Earrings],
  [Medal]
- Main Rewards:
 [Lv. 30 - 59] Riena Strait
- Main Rewards:
 [2 mil Mesos],
  [Spell Traces],
  [Face Accessory],
  [Belt],
  [Medal]
- Main Rewards:
 [Lv. 30 - 59] Secret Forest of Elodin
- Main Rewards:
 [Medal],
  [Spell Traces]
- Main Rewards:
 [Lv. 60] Mushroom Kingdom
- Main Rewards:
 [3 mil Mesos],
  [Spell Traces],
  [Medal],
  [Heavy Violetta Cape],
  [Shackles of Love]
- Main Rewards:
 [Lv. 75] The Afterlands
- Main Rewards:


 [Afterlands Totems]
 - An easy way to obtain permanent Totem equipment but it is known to be slightly buggy and frustrating without a guide
- Here is a guide: https://www.reddit.com/r/Maplestory/comments/8fgfty/afterlands_guide_fastest_way_possible_no_bugs/
- Main Rewards:
 [Lv. 100] Mushroom Shrine Tales
- Upon completing the storyline, the
 [Wings of Fate] cape is rewarded with goods stats but it is tedious to obtain as the storyline is long
- The cape can be reobtained at no cost if discarded thus useful for rerolling bonus stats
- Upon completing the storyline, the
 [Lv. 115] [Pre-Quest] Lion King's Castle
- Main Rewards:
 [Medal]
 - Completing this theme dungeon unlocks access to the boss
 Von Leon
- Main Rewards:
 [Lv. 130] Korean Folk Town
- Main Rewards:
 [Medal]
- Main Rewards:
 [Lv. 130] Golden Temple
- Main Rewards:
 [Ravana's Golden Crown],
  [Medal]
- Main Rewards:
 [Lv. 130] Crimsonheart Castle
- Main Rewards:
 [Medal]
- Main Rewards:
 [Lv. 135] Partem Ruins
- Main Rewards:
 [Medal]
- Main Rewards:
 [Lv. 140] The Far East (Yu Garden)
- Main Rewards:
 [(Heroic World Only) Epic Potential Scroll],

 [Totems]
 - Completing the questline unlocks daily quests that reward
 [Yu Garden Coins] used to exchange items
 - An in-depth guide to the Yu Garden dailies: https://www.reddit.com/r/Maplestory/comments/62tld2/guide_for_yu_garden_dailies_reboot_daily_epic_pot/
- Main Rewards:
 [Lv. 140] Commerci
- Main Rewards:
 [Medal],


 [Commerci Equipment]
 - Upon reaching the town of San Commerci, Trade Voyages is unlocked with rewards such as

 [Sweetwater Gear] and
  [Sweetwater Tattoo],
  [Sweetwater Monocle]
 - Additionally, in San Commerci, Transposing is unlocked
- For more info on Transposing, check out https://www.youtube.com/watch?v=oDXiz0x0hV0
- Main Rewards:
-
 [Lv. 145] Kerning Tower
- Main Reward:
 [Medal]
- Main Reward:
 [Lv. 150] Stone Colossus
- Main Rewards:
 [Medal],
  [Mount],
  [Badge]
- Main Rewards:
 [Lv. 165] Omega Sector
- Main Rewards:
 [Medal]
- Main Rewards:
 [Lv. 175] Detective Rave's Case Notes
- Main Rewards:
 [Medal]
- Main Rewards:
 [Lv. 185] Fox Valley
- Main Rewards:
 [Medal]
- Main Rewards:
Quest Content
Quests are categorized as Job Quests, Main Quests, and Normal Quests. For a full list of quests, check out the MapleStory Wiki
Below is a list of quests from the the Lightbulb icon on the left-hand side. Job Quests will not be listed below
The list may not contain all quests as new quests are frequently added
Recommended Quests:
- (Lv. 33) Have you learned about pets? - Tutorial quest that rewards a 3-day pet (cannot be revived)
- (Lv. 33) Trainer's Command - A special quest for unlocking the ability to have 3 pets out at once. Requires you to obtain a
 [Pet Snack] from the Cash Shop using NX or
  Reward Points
 - (Lv. 35) The Professional - A quest to start Professions, the crafting system
- (Lv. 70) [Link Skill] Teaching Link Skill - An explanation to Link Skills
- Not required to unlock Link Skills
- (Lv. 100) [Ursus] Rumors of The Mighty - Introduction quest to the boss Ursus
- (Lv. 100) [Main][Heliseum] - Introduction quest to the Magnus boss pre-quest
- Starting quest name may be different depending on class
- (Lv. 100) [Mushroom Shrine Tales] Kino Konoko's Request - Introduction quest to the Mushroom Shrine Tales storyline
- (Lv. 105) [Monster Park] Monster Park Grand Re-opening - Introduction quest to Monster Park
- Not required to enter Monster Park
- (Lv. 115) [Papulatus] The Light of Chaos - Introduction quest to the Papulatus boss pre-quest
- (Lv. 120) [Ranmaru] Call of Princess Sakuno: Stop Mori Ranmaru! - Short dialogue quest to unlock access to the boss Mori Ranmori
- (Lv. 125) [Main][Alliance] - Completing this questline grants a passive skill
- Starting quest name may be different depending on class
- (Lv. 180) [Princess No] Regards, Takeda Shingen - Introduction quest to the Princess No boss pre-quest
- (Lv. 130) [Main][Temple of Time] Path to the Past - Introduction quest to the Pink Bean boss pre-quest
- (Lv. 140) [Main][Silent Crusade] A Cry for Help - Introduction quest to the Arkarium boss pre-quest
- There is also a Lv. 190 Silent Crusade quest however, it is not required for Arkarium
- (Lv. 165) [Main][Knight Stronghold] Scouting the Stronghold - Introduction quest to the Cygnus boss pre-quest
- (Lv. 180) [Gollux] The Cracks of Corruption - Short dialogue quest to unlock access to the boss Gollux
- (Lv. 190) [Haven] A New Home - Short dialogue quest to unlock access to Weekly Quests in the Scrapyard
- (Lv. 190) [Dark World Tree] Those Who Remain - Short dialogue quest to unlock access to Weekly Quests in the Dark World Tree
- (Lv. 210) [Ramuramu] Psych Exam - Introduction quest to the Guardian Angel Slime boss pre-quest
- (Lv. 200) [Collector's Request] In Search of the Legend - Quest required to purchase

 potion buffs from the Collector
 - (Lv. 235) [Kao's Memory] The First Memory - Introduction quest to the storyline involving Kao between Lv. 235 to 255
- (Lv. 255) [Aftermath] After that Day & (Lv. 260) [Convergence] Under Ereve - Questline required for 6th Job Advancement
- (Lv. 260) [Epic Dungeon] High Mountain - Questline to unlock weekly activity
Theme Dungeon Starting Quests:
Below is a list of Lightbulb Quests that are introduction quests to Theme Dungeons
- (Lv. 30) [Elodin] Anne's Plea for Help
- (Lv. 30) [Gold Beach] A Golden Opportunity
- (Lv. 30) [Main][Riena Strait] Get it Strait
- (Lv. 30) [Theme Dungeon] Ellinel Fairy Academy
- (Lv. 60) [Mushroom Castle] Mushking's Summons
- (Lv. 75) [The Afterlands] A Cry for Help
- (Lv. 95) [Ellin Forest] A Peculiar Book
- (Lv. 100) [Grand Athenaeum] Visit the Grand Athenaeum
- (Lv. 115) [Main][Lion King's Castle] Among the Tundra
- (Lv. 120) [Fantasy Theme World] Dylan's Story
- (Lv. 125) [Korean Folk Town] A Letter from the Library
- (Lv. 130) [Crimsonheart] To Grendel's Library
- (Lv. 130) [Golden Temple] Noi More Tourists
- (Lv. 135) [Partem Ruins] Dark Prophecy
- (Lv. 140) Finding Tomo - Yu Garden
- (Lv. 140) The Dragon and the Tiger - Beast of Fury
- (Lv. 140) [Commerci Republic] Neinheart's Calls
- (Lv. 145) [Shaolin Temple] Elder Jung's Summons
- (Lv. 145) [Kerning Tower] Kerning Tower Grand Opening
- (Lv. 150) [Main][Stone Colossus] A Giant of a Rumor
- (Lv. 160) [Showa Town] Welcome to Shawa Town!
- (Lv. 160) [Omega Sector] Dr. Kim's Call
- (Lv. 170) [NLC] Welcome back to NLC!
- (Lv. 170) [Main][Kritias] Sudden Kingdom
- (Lv. 175) [Detective Rave's Case Notes] Free Luxury Tour!
- (Lv. 180) [Phantom Forest] The Corrupted Forest
- (Lv. 185) [Fox Valley] Leaf Plane to Adventure
Optional Quests:
- (Lv. 10) Do you know about Maple Guide? - Tutorial quest explaining Maple Guide
- (Lv. 20) Do you know about Spell Enhancements? - Tutorial quest explaining
 Spell Tracing
 - (Lv. 20) Do you know about Star Force Enhancements? - Tutorial quest explaining Star Forcing
- (Interactive Worlds only) (Lv. 33) Mysterious Merchant Matilda - Tutorial quest explaining Matilda, an NPC that sells
 [AP Reset Scrolls], and
  [SP Reset Scrolls] for Mesos
 - (Lv. 60) Have you learned about Potential? - Tutorial quest explaining equipment potentials
- (Lv. 60) Have you learned about Bonus Stats? - Tutorial quest explaining equipment bonus stats
- (Lv. 80) Use the Transfer Hammer! - Tutorial quest explaining Transfer Hammer
- (Lv. 90) [Stellar Detectives] The Erased Diary
- (Lv. 105) [Maple Tour] Lulu Spinel's Request - Introduction quest to Maple Tour
- Not required to enter Maple Tour
- (Lv. 160) [Masteria Epic] Lost Hero's Call - Introduction quest to the Masteria Through Time blockbuster
- (Lv. 190) [Main][Silent Crusade] Strange Letter - A questline related to Will and the Arcane River
- (Lv. 200) [Tower of Oz] Tower Under the Sea - A quest to get started with the Tower of Oz. Provides a quick explanation and tutorial for Tower of Oz
Can Be Skipped:
- (Lv. 33) Do you know about the Beauty Salon? - Tutorial quest explaining the Beauty Salon UI for saving hair and face styles
- Main Rewards:
 [Tutorial Hair Coupon],
  [Tutorial Face Coupon]
- DO NOT USE without saving your current style in the Beauty Salon as they will give you a really bad look
- Main Rewards:
- (Lv. 45) [Kerning City] Dark Swamp Region - Starts the Kerning City area quests for the medal
- (Lv. 50) [Zakum] Statue of Dread - Quest that explains Zakum and teleports you to El Nath - Chief's Residence
- Not required to enter the boss Zakum
- Talking to your corresponding Job NPC (Warrior, Mage, Thief, etc.) will teleport you to the entrance of Zakum
- (Lv. 55) [Perion] Rocky Mountain Hunter - Starts the Perion area quests for the medal
- (Lv. 60) [Main][Verne Mine] Edelstein, the City of Iron - Starts the Verne Mine area quests
- (Lv. 65) [Sleepywood] Danger Seeker - Starts the Sleepywood area quests for the medal
- (Lv. 70) [Cross World Party Quest] The Old Book
- (Lv. 70) [Cross World Party Quest] Old Letter
- (Lv. 70) [Cross World Party Quest] Notes of the Goddess
- (Lv. 70) [Orbis] Helping the Orbis Locals - Starts the Orbis area quests for the medal
- (Lv. 75) [El Nath] Snowfield Explorer - Starts the El Nath area quests for the medal
- (Lv. 75) Shammos Awakening - Quest related to the Resurrection of the Hoblin King Party Quest
- (Lv. 80) [Main][Azwan] Alliance Mission - Starts the Azwan area quests
- (Lv. 85) [Ariant] Learning the Culture of Ariant - Starts the Ariant area quests for the medal
- (Lv. 85) [Main][Magatia's Secret] A Deal with the Broker - Starts the Magatia area quests
- (Lv. 100) [FriendStory] Student From Another World - Storyline about an alternate world where characters are students at a school
- (Lv. 110) [Chryse] Find Xerxes - Quest related to the Chryse Party Quest
- (Lv. 110) [Ludibrium] Ludibrium Sheriff - Starts the Ludibrium area quests for the medal
- (Lv. 115) [Lion King's Castle] The Adventure of Jenn the Locksmith - Quest related to the Lion King's Castle Party Quest
- (Lv. 120) Fly in the Sky! - A quest to learn the skill "Soaring" used in Dragon Rider PQ
- (Lv. 125) [Ghost Park] Korean Folk Town's New Park - A quest explaining Ghost Park
- (Lv. 135) [Mu Lung Garden] How to Become a Sage - Starts the Mu Lung area quests for the medal
- (Lv. 150) [Masteria] Hungry for Adventure - Quest related to Masteria / NLC
- (Lv. 150) The Dragon Rider's Identity 1 - Pre-quest for Dragon Rider PQ
- (Lv. 160) [Ninja Castle] Rumors from the Castle - Storyline for Ninja Castle, not required to fight Gigatoad / False Daimyo
- (Lv. 160) [Main][Henesys Ruins] The Rumor - Starts the Henesys Ruins area quests for the medal
- (Lv. 180) [Twilight Perion] The Second Future - Storyline, it is not required to access Twilight Perion
- (Lv. 190) [Masteria] Glimmer Man's Call - Quest related to Masteria / NLC
- (Lv. 200) [The Asura Crisis] Back to Momijigaoka - A quest to start the Asura Crisis storyline