Level Content Guide
Quick Jumps
- Lv. 1 - 29
- Lv. 30-49
- Lv. 50
- Lv. 60
- Lv. 70
- Lv. 80
- Lv. 90
- Lv. 100
- Lv. 110
- Lv. 120
- Lv. 130
- Lv. 140
- Lv. 150
- Lv. 160
- Lv. 170
- Lv. 180
- Lv. 190
- Lv. 200
- Lv. 210
- Lv. 220
- Lv. 230
- Lv. 240
- Lv. 250+
Level 1 - 29
Follow your class' storyline as these will get you to level 30 and 2nd Job. As well, certain class storylines may be required and provide unique rewards
If you are looking for equipment, monsters near your level will drop equipment or you may buy equipment from NPCs in towns. The follow towns on Victoria Island will have the following low-level gear:
 Perion: Warrior Gear
 Henesys: Archer Gear
 Ellinia: Mage Gear
 Kerning City: Thief Gear
 Nautilus: Pirate Gear
Some notable training maps if you do not want to follow your storyline are:
- Henesys - Golem's Temple: Flaming Mixed Golems and Mixed Golems
- Ellinia - North Forest: Evil Eyes and Curse Eyes
- To find these maps open the World Map ("W" by default) and search for the monsters listed above
Level 30 - 49
Upon reaching Lv. 30, the "Maple Guide" is unlocked to provide shortcut access to main quests, instant teleports to training maps, and more. To expand the UI press "U" by default to see available content for all levels
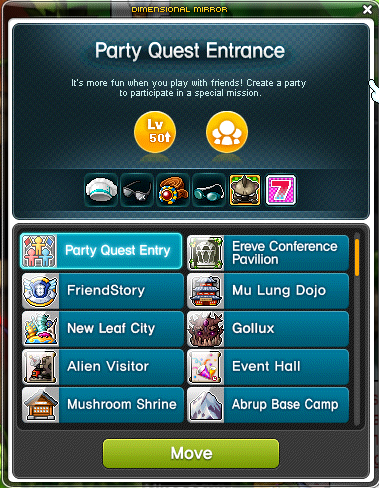
In most towns, the "Dimensional Mirror" NPC grants access to a variety of content. When in town, the "Quick Move" button on the top left corner of the screen provides a shortcut to useful NPCs within the town like the Dimensional Mirror
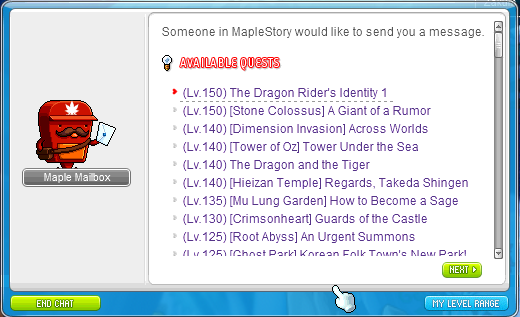
Common quests can be accessed through the  Lightbulb icon on the left-hand side of the screen. Quests found here are typically Job Advancements, class storylines, Theme Dungeons, and content pre-quests. As well, most areas can be returned to via the Dimensional Mirror or Maple Guide
Filtering the quests by clicking the "My Level Range" button on the bottom right is recommended. As well, the list of quests is quite long but, not all quests are required to be completed. The necessary ones will have a [Required] tag in red beside the quest
Content Available:
Recommended
[Content here may unlock content or provide meaningful rewards]
 [Lv. 35] Professions / Crafting: Professions are located in Ardentmill that is accessible from town and "Quick Move". To start, accept the quest "The Professional in the Lightbulb icon"
- In Ardentmill you can unlock all Harvesting Professions: Mining and Herbalism and Crafting Professions: Alchemy, Smithing or Accessory Crafting
- Pressing "B" by default will open the Professions UI where you can view info on your Professions and remaining monsters before special flowers and veins can be harvested. As well, Traits that provide small stat bonuses can be viewed.
- An in-depth guide to Professions: https://www.youtube.com/watch?v=3hfJoCd2utc
4 Theme Dungeons storylines are unlocked at Lv. 30 that can be started through Lightbulb icon. Theme Dungeon storylines provide great EXP and have useful rewards like gear and mesos. The Theme Dungeons below have enemies that scale to your level from Lv. 30 to 59. The monsters are also instanced meaning that the monsters you hunt are different from other players
 [Lv. 30 - 59] Ellinel Fairy Academy:
  [2 mil Mesos],
  [Spell Traces],
  [Cape],
  [Glove],
  [Eye Accessory] and
  [Medal]
 [Lv. 30 - 59] Gold Beach Resort: [2 mil Mesos], [Spell Traces],
  [Earrings] and
  [Medal]
  [Lv. 30 - 59] Riena Strait: [2 mil Mesos], [Spell Traces],
  [Face Accessory],
  [Belt],
  [Medal]
 [Lv. 30 - 59] Secret Forest of Elodin:
  [Medal], [Spell Traces]
Some notable training maps are:
- Gold Beach Resort: Violet Clam Slime and Seashell Octopus Slime
- Elodin: Forest Glimmerfox and Night Glimmerfox
Level 50
Content Available:
Recommended
- [Lv. 50] [Important] Inner Ability: Rerollable stats that are automatically unlocked at Lv. 50. They function similar to potentials with different tiers (Rare, Epic, Unique, Legendary) and can be rerolled using

 Honor EXP or
  Circulators
Optional
[Content here may not be useful compared to recommended content]
 [Lv. 50+] [Boss] Easy Zakum: A boss located in El Nath. The quest "[Zakum] Statue of Dread" in the Lightbulb icon is not required and only teleports you to El Nath - Chief's Residence where you talk to an NPC corresponding to your job (Mage, Archer, Thief, etc.) to teleport to Dead Mines - The Door to Zakum
- Easy Mode and Above Rewards:
 [Zakum Helmet],
  [Mystical Cube],
  [Soul Shard],
  [Intense Power Crystal]
- Easy Mode and Above Rewards:
Some notable training maps are:
- Perion - Wild Boar Land: Wild Boars
- Perion - Excavation Site: Skeledogs and Mummydogs and Skeleton Commander
Level 60
Congratulations on level 60! Welcome to 3rd job!
Using the "Boss Contents" UI provides a direct teleport to bosses after completing their pre-quests. The "Boss Party" Key can be assigned to a Key Slot through the "Keyboard Shortcuts" UI
Defeating monsters is recommended during these levels as there is no useful content to complete
Content Available:
Optional
[Grinding is preferred at these levels as there isn't much to do]
 [Lv. 60] [Theme Dungeon] Mushroom Kingdom: Slower compared to previous Theme Dungeons due to lots of cutscenes
- Main Rewards: [3 mil Mesos], [Spell Traces],
 [Medal],
  [Heavy Violetta Cape],
  [Shackles of Love]
- Main Rewards:
 [Lv. 60] [Party Quest] Cooking with Tangyoon: Requires 1-3 party members to enter. The objective is to defeat monsters in a certain order to cook the correct dish
- Accessible through the Dimensional Mirror by clicking on
 Party Quest Entry
 - Depending on if the dishes were successful or not, you will be rewarded
 Chef Certificates to exchange for equipment
 - Main Rewards:
 [Medal],
  [Tangyoon's Chef Hat],
  [Tangyoon's Chef Outfit]
- Accessible through the Dimensional Mirror by clicking on
 [Lv. 65] [Boss] Lord Balrog: Accessible through the Maple Guide, Boss Contents UI, or by traveling to Sleepywood - Bottom of the Temple
- An indepth guide to Lord Balrog: https://dexless.com/guides/balrog-bossing-guide.123/
- Main Rewards:
 [Lv. 58 Bain Weapon], [Soul Shard],
  [Balrog-Horn Throne]
Some notable training maps are:
Level 70
Content Available:
Recommended
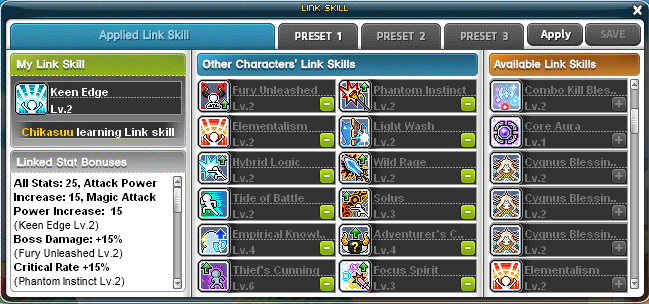
- [Lv. 70] [Important] Link Skills: Class-specific skill that can be shared with another of your characters to both gain the skill. Link Skills are located in your Beginner's Skill Tab by double-clicking on
 Link Manager
- For more info on Link Skills check out: https://maplestorywiki.net/w/Link_Skill
 [Lv. 75] [Theme Dungeon] The Afterlands: Provides an easy way to obtain permanent totem equipment however, it can be easy to get stuck without a guide
- Main Rewards:


 [Afterlands Totems]
 - Here is a guide: https://www.reddit.com/r/Maplestory/comments/8fgfty/afterlands_guide_fastest_way_possible_no_bugs/
- Main Rewards:
Optional
[Grinding is preferred at these levels as there isn't much to do]
- [Lv. 70] Party Quests + Cross World Party Quests: Content to be completed with other players
- Completing Cross World Party Quests rewards Points that can be exchanged for primarily cosmetic items
- Accessible through the Dimensional Mirror by clicking on Party Quest Entry
- Party quests available at Lv. 70 are:
Some notable training maps are:
 El Nath - Ice Valley II: White Fang
 Orbis: Luster Pixie and Cellion and Lioner and Grupin
Level 80
Content Available:
Recommended
 [Lv. 85] [Boss] Normal Hilla: Accessible through the Boss Contents UI, there are no pre-quests
- Hard mode is unlocked at Lv. 170+
- Normal Mode and Above Rewards:
 [Stone of Eternal Life],
  [Lv. 110 Gear],
  [Lv. 120 Necromancer Gear],
  [Elixir],
  [Rebirth Flame],
  [Pet Box], [Mystical Cube],
  [Hard Cube], [Soul Shard], [Intense Power Crystal], [Spell Trace]
Optional
 [Lv. 80] [Party Quest] Nett's Pyramid: Requires 4 party members to enter. The objective is to defeat waves of enemies
- Accessible through the Dimensional Mirror by clicking on Party Quest Entry
- Main Rewards:
 [Immortal Pharaoh Belt],
  [Immortal Pharaoh Shoes],
  [Immortal Pharaoh Ring]
- Accessible through the Dimensional Mirror by clicking on
Some notable training maps are:
 Verne Mine - Shaft 2 & Deep Shaft: Big Spider and Ore Muncher
 Nihal Desert - Sahel 2: Sand Rat and Scorpion
- Nihal Desert - The Desert of Serenity: Sand Rat and Dark Sand Dwarf
Level 90
Content Available:
Recommended
- [Boss] Normal & Chaos Zakum: Both difficulties have much more HP however, Chaos Mode should not be attempted until Lv. 200+
- Normal Mode and Above Rewards:
 [Poisonic Weapons],
  [Condensed Power Crystal],
  [Aquatic Letter Eye],
  [Lv. 110 Rebirth Flame]
 - Chaos Mode Only Rewards:
 [Chaos Zakum Helmet],
  [Enraged Zakum Helmet],
  [Enraged Zakum Cape],
  [Enraged Zakum Belt],
  [Zakum Hand Table]
- Normal Mode and Above Rewards:
 [Lv. 90] [Theme Dungeon] Mushroom Shrine Tales: Accessible from the Dimensional Mirror and the storyline can be started from the Lightbulb Quests
- Upon completing the storyline, the
 [Wings of Fate] cape is rewarded with goods stats but it is tedious to obtain as the storyline is long
- The cape can be reobtained at no cost if discarded thus useful for rerolling bonus stats
- Upon completing the storyline, the
Optional
 [Lv. 95] [Theme Dungeon] Ellin Forest
- Main Rewards:
 [Ephenia's Ring],
  [Medal]
- Main Rewards:
 [Lv. 90] [Theme Dungeon] Stellar Detectives
- Main Rewards:


 [Medal],

 [Damage Skins]
- Main Rewards:
Some notable training maps are:
- Magatia - Lab Area C-1 & Lab Area C-2: Roid and Neo Huroid
 [Star Force 5] Leafre - Sky Nest II: Blood Harp
Level 100
Congratulations on level 100 and welcome to 4th Job! You are now halfway to level 200 and 5th job
Content Available:
Recommended
- [Training] Star Force Maps: Training maps with stronger enemies that give more EXP but require a certain amount of Star Force Enhancements on your gear to deal damage to enemies
- For more info on Star Force check out: https://maplestorywiki.net/w/Enhancing and https://strategywiki.org/wiki/MapleStory/Spell_Trace_and_Star_Force
 [Lv. 100] [Pre-Quest / Storyline] Heliseum: Completing this storyline unlocks access to the boss
  Magnus and daily quests for
  Shadowdealer Coins that are used to buy gear from Mayala
- Notable shop items:

 [Superior Cape],
 [Superior Shoe],
  [Superior Belt],
  [Antique Root Gloves]
- Superior equipment grant more stats when Starforcing but cost more mesos and have a higher chance to destroy on failure
- Notable shop items:
 [Lv. 105] [Recommended] Monster Park: Accessible through the Dimensional Mirror. Stage-based dungeons that reward a considerable amount of EXP and
  [Monster Park Commemorative Coin] for exchanging items
- Can be completed 1 time per day for free and extra runs will cost Maple Points
- There is an item that grants extra runs in the Cash Shop available with Reward Points (Interactive Worlds) or Mesos (Heroic Worlds)
- The coins can be exchanged for potion buffs


 that can be stored in storage which are useful training and bossing
 - Completing Monster Park 77 times for each day of the week will reward a
 [Medal] that provides +10% Ignore Enemy Defense
- Can be completed 1 time per day for free and extra runs will cost Maple Points
 [Lv. 105] [Recommended] Maple Tour: Accessible through the Dimensional Mirror. Maple Tour is similar to Monster Park, but instead reward Mesos and
  [Maple Tour Coins] that can be exchanged for items
- Mesos are accumulated and can be retrieved 7 days later for the full amount or retrieved earlier for half the amount
- Can be completed 2 times per day for free and extra runs will cost Maple Points
 [Lv. 100] [Recommended] [Boss] Ursus: Accessible from the Dimensional Mirror. Ursus is a party boss that rewards Mesos
- Materials are rewarded for defeating Ursus that can be exchanged for items
- For more info on Ursus, check this out: https://strategywiki.org/wiki/MapleStory/Ursus
 [Lv. 105] Mu Lung Dojo: Accessible through the Dimensional Mirror. Players fight a series of bosses to compete with other players based on time and floor reached
- Rewards will be given based on your weekly ranking such as:
 Hero's Gloves [Glove],
  [Title]
 - Based on the floors cleared, points are rewarded that can be exchanged for items
- Notable items:
 [Honor EXP],
  [Passive EXP Zone Entry Coupon]
- Notable items:
- Rewards will be given based on your weekly ranking such as:
Optional
 [Lv. 100] [Theme Dungeon] Grand Anthenaeum: Accessible from the Dimensional Mirror. The Grand Anthenaeum consists of storylines based on the Maple World lore and previously experienced class and area storylines
- Main Rewards:
 [Scholarly Pendant] for completing 3 stories
- Main Rewards:
-
 [Lv. 100] [Theme Dungeon] FriendStory: Accessible from the Dimensional Mirror and the storyline can be started from the Lightbulb Quests. FriendStory is an alternate world storyline where the characters of Maple World are students and teachers at a school
- Main Rewards:

 [Regular School Uniform Coupon],
  [Shinsoo School Badge],
 [Chair]
- Main Rewards:
Some notable training maps are:
- Leafre - West Leafre Forest: Rash and Dark Rash
- [Star Force 5] Leafre - Sky Nest II: Blood Harp
- [Star Force 15] Leafre - The Area of Black Kentaurus: Black Kentaurus
Level 110
Content Available:
Recommended
- [Lv. 115] [Boss] Easy Magnus: Completing the Helisium storyline unlocks access to Magnus
- Easy Mode and Above Rewards: [Superior Belt], [Superior Cape],
 [Crystal Ventus Badge],
  [Royal Black Metal Shoulder], [Elixir], [Lv. 110 Rebirth Flame], [Mystical Cube], [Soul Shard], [Shadowdealer Coin], [Intense Power Crystal]
 - Superior Gear grant more stats when Starforcing but cost more mesos and have a higher chance to destroy on failure
- Easy Mode and Above Rewards:
 [Lv. 115] [Boss] Easy Papulatus: Completing a questline in Ludibrium unlocks access to all difficulties but only Easy is available at Lv. 110. The boss is accessible from the Boss Contents UI or within Ludibrium at Ludibrium Clocktower
- Easy Mode and Above Rewards: [Elixir], [Lv. 110 Rebirth Flame], [Mystical Cube], [Soul Shard], [Intense Power Crystal]
- A guide to the pre-quests: https://www.youtube.com/watch?v=mAq43NaBFmY
- Easy Mode and Above Rewards:
 [Lv. 115] [Pre-Quest / Theme Dungeon] Lion King's Castle: Storyline can be started from the Lightbulb Quests or by traveling from El Nath. Completing this Theme Dungeon unlocks the boss
  Von Leon available at Lv. 125
- Main Rewards:
 [Medal]
- Main Rewards:
Optional
 [Lv. 110] [Party Quest] Xerxes in Chryse: Requires 1 to 4 party members to enter. There are 4 stages and a boss at the final stage.
- Accessible through the Dimensional Mirror by clicking on Party Quest Entry
- Main Rewards:
 Michael's New Glasses
- Accessible through the Dimensional Mirror by clicking on
Some notable training maps are:
- Ludibrium - Toy Factory: Robo and Master Robo
- [Star Force 26] Ludibrium - Unbalanced Time: Dual Ghost Pirate
- [Star Force 15] Leafre - The Area of Black Kentaurus: Black Kentaurus
Level 120
Content Available:
Recommended
 [Lv. 125] [Boss] Root Abyss: Accessible from the Dimensional Mirror or Boss Contents UI after completing the storyline from the Lightbulb Quests. Root Abyss contains 4 bosses where Normal mode is unlocked at Lv. 125 and Chaos mode is unlocked at Lv. 180
- Normal mode and Above Rewards:


 [Root Abyss Hat], [Elixir], [Rebirth Flame], [Soul Shard], [Mystical Cube], [Intense Power Crystal], [Spell Trace],
  [Yggdrasil Rune],


 [Chair]
 - Chaos bosses drop


 fragments that are exchanged for
 Root Abyss equipment also referred to as CRA (Chaos Root Abyss)
- Normal mode and Above Rewards:
 [Lv. 120] [Blockbuster] Black Heaven: A storyline with multiple Acts
- Black Heaven is not required to unlock access to the boss Lotus or weekly quests
- Can be started from the Lightbulb Quest "[Black Heaven] For Maple World" and accessible from the Dimensional Mirror by clicking on
 Ereve Conference Pavillion
 - Completing each Act rewards [Honor EXP]
- Act 2 Rewards:
 [Medal],
  [Chair]
 - Act 4 Rewards:
 [Hat]
[Hat] - Act 6 Rewards:
 [Medal],
 [Choice of 1 mount (lasts 30 days)]
 [Lv. 120] [Boss] Normal Mori Ranmaru: Accessible from Boss Contents UI or travelling to Dead Mine in El Nath after completing a short dialogue Lightbulb Quest
- Hard mode is unlocked at Lv. 190+
- Normal Mode and Above Rewards:
 [Lv. 120 Gear], [Elixir], [Lv. 120 Rebirth Flame], [Mystical Cube], [Intense Power Crystal],
  [(Heroic World Only) Powerful Rebirth Flame],
  [(Heroic World Only) Eternal Rebirth Flame]
 - Hard Mode Only Rewards:
 [Japanese Armor],
  [Power Elixir],
  [Lv. 130 Rebirth Flame]
- [Lv. 125] [Boss] Von Leon: Accessible through the Boss Contents UI after completing the Lion King's Castle Main Quest
- Easy/Normal Mode and Above Rewards: [Elixir], [Rebirth Flame], [Soul Shard], [Mystical Cube],
 [Von Leon Gear Currency], [Intense Power Crystal]
 - Hard Mode and Above Rewards:

 [Lv. 130 Von Leon Gear],

 [Ifia Accessories],
  [Lion Ice Sculpture]
 - The medals are used to exchange for

 [Lv. 130 Von Leon Gear] from Murt
- Easy/Normal Mode and Above Rewards:
Optional
 [Lv. 125] [Theme Dungeon] Korean Folk Town: Can be started by accepting the Lightbulb Quest or by traveling from Ludibrium or Aqua Road
- Rewards:
 [Medal]
- Rewards:
 [Lv. 125] Ghost Park: Accessible from the Dimensional Mirror. The objective is to survive while defeating monsters
- Main Rewards:
 [Title],
  [Chair],

 [Character Effects]
- Main Rewards:
 [Lv. 120] [Theme Dungeon] Fantasy Theme World: Accessible from Ludibrium
- Main Rewards:
 [Heart Bracelet],
  [Medal],
 [Ludi Targa Hat] & [Ludi Scarlion Hat]
- Main Rewards:
 [Lv. 120] [Party Quest] Dimensional Crack: Requires 3 to 6 party members to enter. There are 6 stages and a boss at the final stage
- Accessible through the Dimensional Mirror by clicking on Party Quest Entry
- Main Reward:
 [Broken Glasses]
- Accessible through the Dimensional Mirror by clicking on
Some notable training maps are:
- Korean Folk Town - Black Mountain Entrance: Moon Bunny
- [Star Force 26] Ludibrium - Unbalanced Time: Dual Ghost Pirate
- [Star Force 26] Ludibrium - Warped Passage: Gatekeeper
Level 130
Content Available:
Recommended
 [Lv. 135+] [Boss] Horntail: Accessible through the Boss Contents UI or by travelling to Leafre, Cave of Life - Entrance. Easy and Normal mode is unlocked once you reach Lv. 130+ and Chaos mode is unlocked at Lv. 135+
- Easy Mode and Above Rewards:
 [Silver Blossom Ring],
  [Dea Sidus Earrings],
  [Horntail Necklace], [Elixir], [Lv. 120 Rebirth Flame], [Mystical Cube], [Intense Power Crystal]
 - Normal Mode and Above Rewards:
 [Wealth Aquisition Potion Recipe]
 - Chaos Mode Only Rewards:
 [Chaos Horntail Necklace], [Power Elixir],
  [Horntail Fountain]
- Easy Mode and Above Rewards:
- [Lv. 135] [Blockbuster] Heroes of Maple: A storyline with multiple acts where you play as the five Heroes of Maple (Mercedes, Phantom, etc.)
- Heroes of Maple is not required to unlock acccess to the boss Damien or weekly quests
- Accessible by accepting the quest in the Lightbulb icon called "[Heroes] Feelings of Misfortune"
- Can also be accessed from Dimensional Mirror by clicking on Ereve Conference Pavillion after accepting quest
- Can also be accessed from Dimensional Mirror by clicking on
- Completing an Act rewards [Honor EXP] and


 [Chair] and completing all Acts twice rewards
  [Chair]
Optional
 [Lv. 130] [Theme Dungeon] Golden Temple: Accessible from the Dimensional Mirror and can be started from the Lightbulb Quest
- Main Rewards:
 [Ravana's Golden Crown],
  [Medal]
- Main Rewards:
 [Lv. 130] [Theme Dungeon] Crimsonheart Castle: Accessible from the Dimensional Mirror and can be started from the Lightbulb Quest
- Main Rewards:
 [Medal]
- Main Rewards:
 [Lv. 135] [Theme Dungeon] Partem Ruins: Can be started through the Lightbulb Quest and accessible from Partem in Henesys
- Main Rewards:
 [Medal]
- Main Rewards:
 [Lv. 130] [Party Quest] Lord Pirate: Requires parties of 3 to 6 to enter. There are 4 stages and a boss at the final stage
- Accessible through the Dimensional Mirror by clicking on Party Quest Entry
- Possible Rewards:
 [Lord Pirate Hat]
- Accessible through the Dimensional Mirror by clicking on
Some notable training maps are:
- Korean Folk Town - Goblin House: Yellow King Goblin
- [Star Force 55] El Nath - The Cave of Trial: Jr. Cerebes and Bain
Level 140
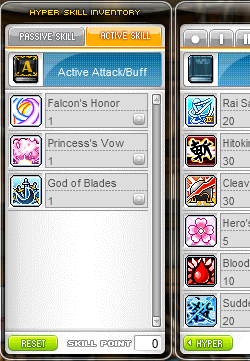
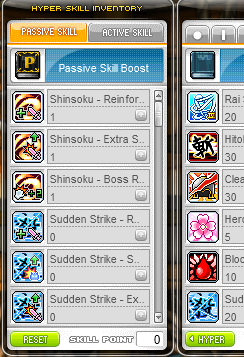
Hyper Skills and Hyper Stats are unlocked at Level 140. Hyper Skills have a passive and active category. Active Skills are unlocked at Lv. 140, 160, and 190. Passive Hyper Skills provide enhancements to 1st - 4th Job skills. Passive Hyper Skills SP are gained at Lv. 140, 150, 165, 180 and 190 (total of 5 SP)
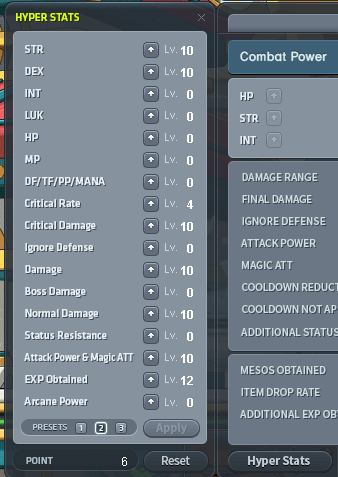
Hyper Stats is a system where Points earned each level can be allocated to gain stats like %Crit Rate, %Crit Damage, %Ignore DEF, or %Boss Damage. As you level up a Hyper Stat, it will cost more Points to upgrade. The amount of Points gained every level increase every 10 levels
For more info on Hyper Stats, check out: https://strategywiki.org/wiki/MapleStory/Hyper_Stats
Content Available:
Recommended
 [Lv. 140] [Theme Dungeon] Commerci: Accessible from the Dimensional Mirror and the storyline can be started from the Lightbulb
- Upon reaching the town of San Commerci, Trade Voyages is unlocked with rewards such as

 [Sweetwater Gear] and
  [Sweetwater Tattoo],
  [Sweetwater Monocle]
 - Additionally, in San Commerci, Transposing is unlocked
- For more info on Transposing, check out https://www.youtube.com/watch?v=oDXiz0x0hV0
- Main Rewards:
 [Medal],


 [Commerci Equipment]
- Upon reaching the town of San Commerci, Trade Voyages is unlocked with rewards such as
 [Lv. 130] [Pre-Quest / Storyline] Temple of Time: Completing this storyline unlocks access to the boss
  Pink Bean
 [Lv. 145] [Theme Dungeon] Kerning Tower: Accessible by accepting the Lightbulb Quest or by travelling from Kerning City
- Main Reward:
 [Medal]
- Main Reward:
 [Lv. 180] [Pre-Quest / Storyline] Hieizan: Completing this storyline will unlock access to the boss Princess No
- A guide to the Pre-Quest: https://www.youtube.com/watch?v=5AuXfVfkMgU
 [Lv. 140] [Boss] Arkarium: Accessible through the Boss Contents UI or by travelling to Temple of Time after completing the questline from the Lightbulb Quest called “[Silent Crusade] A Cry for Help”
- Easy Mode and Above Rewards:
 [Mechanator Pendant], [Elixir], [Lv. 130 Rebirth Flame],
  [Primal Essence], [Soul Shard], [Mystical Cube], [Intense Power Crystal], [Spell Trace]
 - Normal mode Only Rewards:
 [Dominator Pendant],
  [Arkarium Statue], [Power Elixir]
- Easy Mode and Above Rewards:
- [Lv. 140] [Boss] Normal Pink Bean : Accessible from the Boss Contents UI or by navigating to Temple of Time after completing the storyline in Temple of Time
- Normal Mode and Above Rewards:
 [Black Bean Mark],
  [Golden Clover Belt],
  [Pink Holy Cup], [Power Elixir], [Lv. 120 Rebirth Flame], [Soul Shard], [Mystical Cube], [Intense Power Crystal]
- Normal Mode and Above Rewards:
- [Lv. 180+] [Boss] Princess No: Accessible from the Boss Contents UI or by travelling to Momijigaoka after completing the Hieizan storyline
- Main Rewards:
 [Secondary Weapon Fragment],

 [ Shoulder / Ring / Belt ],
  [Princess No Chair],
  [Princess No Effect Coupon],
  [Power Elixir],
  [Lv. 140 Rebirth Flame], [Mystical Cube], [Intense Power Crystal]
 - These fragments
 can be used to exchange for
 [Secondary Weapons]
- Main Rewards:
Optional
 [Lv. 140] [Theme Dungeon] The Far East (Yu Garden): Accessible from Six Path Crossway
- Completing the questline unlocks daily quests that reward
 [Yu Garden Coins] used to exchange items
 - Main Rewards:
 [(Heroic World Only) Epic Potential Scroll],

 [Totems]
 - An in-depth guide to the Yu Garden dailies: https://www.reddit.com/r/Maplestory/comments/62tld2/guide_for_yu_garden_dailies_reboot_daily_epic_pot/
- Completing the questline unlocks daily quests that reward
 [Lv. 140] [Theme Dungeon] Beasts of Fury
- Main Rewards:

 [Medal],
 [Chair],
  [Special Potential Scroll],
  [Bonus Potential Scroll],
  [Prototype Soul Enchanter],
 [Title]
- Main Rewards:
 [Lv. 140] [Party Quest] Escape: Requires 3-6 party members to enter. There are 7 stages and a boss at the final stage
- Accessible through the Dimensional Mirror by clicking on Party Quest Entry
- Main Rewards:
 [Von Leon Belt]
- Accessible through the Dimensional Mirror by clicking on
 (Lv. 145) [Theme Dungeon] Shaolin Temple: Storyline can be started from the Lightbulb Quest or by navigating from the Maple Guide or the Shanghai Dimensional Portal from Six Path Crossway
- Main Rewards:
 [Mount],
  [Damage Skin],
  [Chair],
  [Totem]
- Main Rewards:
Some notable training maps are:
- Korean Folk Town - Goblin House: Yellow King Goblin
- Kerning Tower - 5F Cosmetics Store 1: Killer Cosmetics
- [Star Force 65] Leafre - Black Wyvern's Nest: Dark Wyvern
- [Star Force 80] Kerning Tower - 2F Cafe 4: Enraged Espresso Machine
Level 150
Content Available:
Recommended
- [Lv. 155] [Boss] Normal Papulatus: Completing a questline in Ludibrium unlock access to Papulatus. The boss is accessible from the Boss Contents UI or within Ludibrium at Ludibrium Clocktower
- A guide to the pre-quests: https://www.youtube.com/watch?v=mAq43NaBFmY
- Normal Mode and Above Rewards: [Power Elixir],
 [Papulatus Clock Chair]
- [Lv. 155] [Boss] Normal Magnus: Completing the Helisium storyline unlocks access to Magnus
- Normal Mode and Above Rewards: [Superior Nova Cape], [Power Elixir]
- Normal Mode and Above Rewards:
Optional
 [Lv. 150] [Party Quest] Dragon Rider: Requires 3-6 party members to enter. There are 5 stages and a boss on the final stage
- Accessible through the Dimensional Mirror by clicking on Party Quest Entry
- Main Rewards:


 [Lv. 100 - 110 Gear]
- Accessible through the Dimensional Mirror by clicking on
 [Lv. 150] [Theme Dungeon] Stone Colossus: Accessible from Leafre
- Main Rewards:
 [Medal],
  [Mount],
  [Badge]
- Main Rewards:
Some notable training maps are:
- Stone Colossus - Colossus West Road 2: Mantis and Blood Mantis
- Kerning Tower - 5F Cosmetics Store 1: Killer Cosmetics
- [Star Force 80] Kerning Tower - 2F Cafe 4: Enraged Espresso Machine
Level 160
Content Available:
Recommended

 [Lv. 160] [Pre-Quest / Storyline] Gate to the Future: A questline required to unlock access to the boss
  Cygnus
 [Lv. 165] [Theme Dungeon] Omega Sector: Accessible by starting Lightbulb Quest or by navigating to Ludibrium Eos Tower
- Main Rewards:
 [Medal]
- Main Rewards:
 [Lv. 160] [Recommended Blockbuster] Masteria Through Time: A storyline with multiple Acts
- Completing each Act rewards [Honor EXP]
- Act 4 Rewards:
 [Medal],
  [Subani's Pendant]
 - Depending on choice rewards:
 [Chair],
  [Subani-Roid] OR
  [Chair],
  [Dr. Jang-Roid]
- Completing each Act rewards
- [Lv. 165] [Boss]Cygnus : Accessible from the Boss Contents UI after completing the pre-quest in the Gate to the Future
- Easy Mode and Above Rewards: [Power Elixir], [Lv. 140 Rebirth Flame], [Soul Shard],

 [Empress Gear Fragment], [Mystical Cube], [Intense Power Crystal]
 - Normal Mode Only Rewards:
 [Empress Shoulder],

 [Shield Recipes],
  [Plush Cygnus Shelf]
 - These fragments
 exchange for
 [Lv. 140 Empress Gear]
- Easy Mode and Above Rewards:
Optional
 [Lv. 160] [Storyline] Showa Town: Accessible accepting the Lightbulb Quest called "[Showa Town] Welcome to Showa Town!" or from Mushroom Shrine via the Dimensional Mirror
- Main Rewards:
 [Medal],
 [Chair],
  [Bullet Ammo],
 [Pet Equip Scroll],
 [Cash Outfit]
- Main Rewards:
- [Lv. 160] [Boss] Yakuza Boss: Accessible after completing the storyline in Showa Town up to the quest "Investigating Fire Raccoon Finance"
- Main Rewards:


 [Terminus Weapons],
 [Damage Skins]
- Main Rewards:
 [Lv. 160] [Party Quest] Kenta in Danger: Requires 2-6 party members to enter. There are 4 stages and boss on the final stage
- Accessible through the Dimensional Mirror by clicking on Party Quest Entry
- Main Rewards:
 [Kenta's New Goggles]
- Accessible through the Dimensional Mirror by clicking on
Some notable training maps are:
- Showa Town - Armory: Dusk Viper
- Temple of Time - Road to Oblivion 2/3: Oblivion Guardian and Chief Oblivion Guardian
- Knight Stronghold - Knight District 2: Official Knight C
- [Star Force 80] Kerning Tower - 5F Cosmetics Store 4>: Deadly Dressing Table
Level 170
Content Available:
Recommended
 [Lv. 175] [Theme Dungeon] Detective Rave's Case Notes: Can be started by accepting the Lightbulb Quest or by navigating from Pantheon
- Main Rewards:
 [Medal]
- Main Rewards:
 [Lv. 170] [Storyline] New Leaf City: Accessible from the Dimensional Mirror. Completing the storyline rewards
  [NLC Commemorative Coins] used to exchange items from Spinel
- Main Rewards:


 [Masteria Explorer Gear]
- Main Rewards:
- [Lv. 170+] [Boss] Chaos Pink Bean: Accessible from the Boss Contents UI or by navigating to Temple of Time after completing the storyline in Temple of Time
- Chaos Mode Only Rewards:

 [Chaos Pink Bean Set],
 [Black Bean Set], [Powerful Rebirth Flame], [Eternal Rebirth Flame],
  [Pink Bean Armchair]
- Chaos Mode Only Rewards:
- [Lv. 175+] [Boss] Hard Magnus: Completing the Helisium storyline unlocks access to Magnus
- Hard Mode Only Rewards:
 [Superior Tyrant Cape], [Superior Nova Boots],
  [Cursed Kaiserium],
  [Lv. 150 Rebirth Flame],
  [Magnus Coin],
  [Magnus Horn Throne]
 - [Magnus Coin] is used exchange for [Tyrant Capes]
- Hard Mode Only Rewards:
- [Lv. 170+] [Boss] Hard Hilla: Accessible through the Boss Contents UI, there are no pre-quests
- Hard Mode Only Rewards:
 [Will O' the Wisps],
  [Hilla Obelisk Floor Lamp]
 - Drop rate is increased for [Pet Box] in Hard Hilla
- Hard Mode Only Rewards:
Optional
 [Lv. 170] [Storyline] Kritias: Accessible from Leafre, completing this storyline unlocks access to Weekly Quests that reward
  [Kritias Commemorative Coins] used for exchanging items
- Notable items: [Superior Tyrant Glove],
 [Boss Reset Tickets]
 - Reset tickets give you an extra clear for a boss
- An in-depth guide to Kritias: https://dexless.com/guides/kritias-everything-you-need-to-know-about-it.217/
- Notable items: [Superior Tyrant Glove],
- [Lv. 160] [Boss] Gigatoad: Located within Ninja Castle. This boss is unlocked once you reach Lv. 160, there are no pre-quests
- Main Rewards: [Terminus Weapons],

 [Elemental Staves],
  [(30 Day) Toad Pet Coupon],
  [Damage Skin],
  [Clean Slate Scroll], [EXP Accumulation Potion Recipe], [Wealth Acquisition Potion Recipe], [Soul Shard],
  [Golden Toad Sculpture]
 - [Golden Toad Sculpture] is used to exchange items from Princess Yuzume
- Main Rewards:
 [Lv. 170] [Party Quest] Resurrection of the Hoblin King: Requires 2-6 party members to enter. There are 4 stages and a boss on the final stage
- Accessible through the Dimensional Mirror by clicking on Party Quest Entry
- Main Rewards:


 [Earrings],
  [Mount]
- Accessible through the Dimensional Mirror by clicking on
Some notable training maps are:
- Savage Terminal - Seedy Scrapyard 2: Prickly Hedgehog and Foul Ooze Waste
- Showa Town - Armory: Dusk Viper
- Omega Sector - Corridor 202: Gray Luxury Saucer
- [Star Force 140] Omega Sector - Corridor H01/2/3: Gray Commuter Saucer
Level 180
Content Available:
Recommended
 [Lv. 185] [Theme Dungeon] Fox Valley: Accessible by accepting a quest in the Lightbulb Quest and by travelling from Pantheon
- Main Rewards;
 [Medal]
- Main Rewards;
- [Lv. 180+] [Boss] Chaos Root Abyss: Accessible from the Dimensional Mirror or Boss Contents UI after completing the storyline from the Lightbulb Quests
- Chaos Mode Only Rewards: [Chaos Hat], [Power Elixir], [Lv. 150 Rebirth Flame],
 [Chaos Yggdrasil Rune], [Chair],


 [Furniture]
 - These fragments exchange for
 [Lv. 150 Root Abyss Gear]
- Chaos Mode Only Rewards:
 [Lv. 180+] [Boss] Gollux: Accessible from the Dimensional Mirror and Boss Contents UI upon completing a short dialogue Lightbulb Quest. Gollux is a boss consisting of multiple segments
- There are 4 difficulties based on how many limbs are defeated before taking on Gollux's Head
- Main Rewards:

 [Gollux Penny/Coins],


 [Gollux Accessories],
  [(Hell Mode Only) Gollux Wood Bench], [Mystical Cube]
 - The coins are used to exchange for [Gollux Accesories] and
 [Advanced Gollux Scrolls] to upgrade the accessories
- [Lv. 180+] [Boss] Hard Mori Ranmaru: Accessible from Boss Contents UI or travelling to Dead Mines in El Nath after completing a short dialogue Lightbulb Quest
- Hard Mode Only Rewards:
 [Solid Cube]
- Hard Mode Only Rewards:
- [Lv. 180+] [Boss] OMNI-CLN: Accessible from the Boss Contents UI or by travelling from Omega Sector after completing the Omega Sector Theme Dungeon
- Main Rewards: [Elixir], [Lv. 110 Rebirth Flame],
 [OMNI-CLN Component],
  [OMNI-CLN Vacuum], [Mystical Cube], [Intense Power Crystal], [Spell Trace]
- Main Rewards:
Optional
- [Lv. 180] [Daily Quest / Storyline] Crimsonwood - Phantom Forest: Accessible from New Leaf City. Completing the storyline unlocks Daily Quests that reward
 [Raven Ninja Coins] and
  [Shadowknight Coins] for exchanging items from Mo and Fiona in the Phantom Forest
- Main Rewards:


 [Masteria's Legacy Gear],

 [iTCG Gear],
  [Balanced Fury],
  [Crystal Ilbis]
- Main Rewards:
Some notable training maps are:
 Twilight Perion - Deserted Southern Ridge + Desolate Hills: Swollen Stump
- Twilight Perion - Forsaken Excavation Site 2/3/4: Sinister Rocky Mask and Sinister Steel Mask
- Fox Valley - Fox Tree Midway 1: Snowy Stjartmes
- [Star Force 140] Omega Sector - Corridor H01/2/3: Gray Commuter Saucer
Level 190
Content Available:
Recommended
- [Lv. 190+] [Boss] Chaos Papulatus: Completing a questline in Ludibrium unlock access to Papulatus. The boss is accessible from the Boss Contents UI or within Ludibrium at Ludibrium Clocktower
- A guide to the pre-quests: https://www.youtube.com/watch?v=mAq43NaBFmY
- Hard Mode Only Rewards:
 [Papulatus Mark],
  [Papulatus Wall Clock]
 [Lv. 190+] [Boss] Lotus: Accessible from the Boss Contents UI or travelling from Scrapyard
- Normal Mode and Above Rewards:
 [Extraordinary Energy Core (Grade S)],
  [Sparkling Blue Star Potion],
  [Sparkling Red Star Potion],
  [Small EXP Accumulation Potion], [Powerful Rebirth Flame],
  [50% EXP Coupon Voucher], [Power Elixir], [Lv. 150 Rebirth Flame], [Soul Shard], [Mystical Cube], [Intense Power Crystal], [Spell Trace],
  [(Interactive Worlds Only) Bonus Mystical Cube]
 - Hard Mode Only Rewards:
 [AbsoLab Armor/Weapon Box],
  [Damaged Black Heart],
  [Lotusroid Android],
  [Beserked Face Accessory],
  [Orchid's Plush Bunny],
  [Black Rebirth Flame], [Eternal Rebirth Flame],
  [(Interactive Worlds Only) Incredible Chaos Scroll of Goodness 60%],
  [(Interactive Worlds Only) Scroll - Accessory Coupon],
  [(Interactive Worlds Only) Unrelenting Flame],
  [(Interactive Worlds Only) Forever Unrelenting Flame],
  [(Interactive Worlds Only) Forever Unrelenting Black Flame]
 - are used to combine with
 [Diffusion-Line Energy Core (Grade A)] to create
  [Absolab Coins] for exchanging


 [ (Shoe/Glove/Cape/Weapon) AbsoLab Gear]
 - Extreme Mode Only Rewards:
 [Total Control - Android Heart]
- Normal Mode and Above Rewards:
 [Lv. 190+] [Boss] Damien: Accessible from the Boss Contents UI or travelling from Dark World Tree
- Normal Mode Rewards: ,
 [(Demon-Class Exclusive) Ruin Force Shield],
  [Twisted Stigma Spirit Stone], [Sparkling Blue Star Potion], [Sparkling Red Star Potion], [Small EXP Accumulation Potion], [Powerful Rebirth Flame], [50% EXP Coupon Voucher], [Power Elixir], [Lv. 150 Rebirth Flame], [Soul Shard], [Mystical Cube], [(Interactive Worlds Only) Bonus Mystical Cube], [Intense Power Crystal], [Spell Trace]
 - Hard Mode Only Rewards:
 [Damienroid Android],
  [Magic Eyepatch], [AbsoLab Armor/Weapon Box],
  [Damien's Sword], [Black Rebirth Flame], [Eternal Rebirth Flame], [(Interactive Worlds Only) Incredible Chaos Scroll of Goodness 60%], [(Interactive Worlds Only) Scroll - Accessory Coupon], [(Interactive Worlds Only) Unrelenting Flame], [(Interactive Worlds Only) Forever Unrelenting Flame], [(Interactive Worlds Only) Forever Unrelenting Black Flame]
 - are used to combine with
 [Faint Stigma Spirit Stone] to create
  [Stigma Coins] for exchanging

 [ (Hat/Overall/Shoulder/Weapon) AbsoLab Gear]
- Normal Mode Rewards: ,
- [Lv. 190] [Weekly Quest / Area] Scrapyard: Unlocked upon reaching Lv. 190
- Weekly Quests and monster drops give [Diffusion-Line Energy Core (Grade A)] used to create [AbsoLab Coins] for exchanging [ (Shoe/Glove/Cape/Weapon) AbsoLab Gear]
- Weekly Quests and monster drops give
- [Lv. 190] [Weekly Quest / Area] Dark World Tree: Unlocked upon reaching Lv. 190
- Weekly Quests and monster drops give [Faint Stigma Spirit Stone] used to create [Stigma Coins] for exchanging [ (Hat/Overall/Shoulder/Weapon) AbsoLab Gear]
- Weekly Quests and monster drops give
Optional
- [Lv. 190] [Storyline] Crimsonwood: Accessible from New Leaf City
- Main Rewards:
 [Medal]
- Main Rewards:
Some notable training maps are:
- Scrapyard - Scrapyard Hill 4: Chaseroid Red and Hunterizer Red
- Twilight Perion - Forsaken Excavation Site 2/3/4: Sinister Rocky Mask and Sinister Steel Mask
- [Star Force 140] Omega Sector - Corridor H01/2/3: Gray Commuter Saucer
Level 200
5th Job Advancement:
Mandatory Requirements to accept 5th Job Quest:
- 100 Star Force minimum accumulated total
- 10 Star Force on Primary Weapon
Requirements to Job Advance: 

- After talking to the Memory Keeper and Temple Keeper, you'll receive a quest called "5th Job: Blessing of the Goddess". Talk to all the Goddesses within the Horizon Portal to job advance to 5th Job
- Each goddess will give you an
 Arcane Stone which you can charge up by defeating monsters. Once the stone has been charged, you can use it again to gain some EXP
- You do not need to charge the stones up to Job Advance
After Advancement, obtaining an Arcane Symbol: To effectively damage monsters in the Arcane River, Arcane Power is required similar to Star Force which you gain from equipping Arcane Symbols
- To obtain your Arcane Symbol, you must complete the quest "A Greater Power" located in your Lightbulb Quests. This quest is intentionally difficult as you have no Arcane Power
- The initial symbol you obtain is not a real Arcane Symbol yet until you complete the Vanishing Journey storyline. In the meantime, you must complete the story with the limited Arcane Power you have
- [Tip]: If you are struggling to defeat the monsters, there is a Hyper Stat for Arcane Power, allocate some points temporarily until you get enough Arcane Power
Content Available:
Recommended
 [Lv. 200] [Daily Quest / Area] Arcane River - Vanishing Journey: Completing the storyline here rewards you with your first
  [Arcane Symbol]
- Completing the storyline also unlocks a Weekly Activity and Daily Quests that reward [Arcane Symbols]
- Completing the storyline also unlocks a Weekly Activity and Daily Quests that reward
- [Lv. 200] [Weekly Party Quest] Erda Spectrum: Unlocked after completing the Vanishing Journey storyline. Requires 1-3 party members to enter. There are 2 stages and the objective to help Nina conduct research
- Main Reward: [Arcane Symbols]
- Main Reward:
 [Lv. 205] [Area] Arcane River - Reverse City: Accessible from Vanishing Journey
- Main Reward:
 [Arcane Symbol Selector Coupon],
  [T-Boy's Monitor]
- Main Reward:
 [Lv. 200] [Boss] Akechi Mitsuhide: Accessible through the Boss Contents UI or travelling from Mushroom Shrine
- Main Rewards:

 [Japanese Wolf Weapons],
  [Mark of the Silver Wolf], [Sparkling Blue Star Potion], [Sparkling Red Star Potion], [Small EXP Accumulation Potion], [50% EXP Coupon Voucher], [Powerful Rebirth Flame], [Mystical Cube], [Power Elixir], [Intense Power Crystal], [(Interactive Worlds Only) Bonus Mystical Cube]
 - The coins are used to exchange for Japanese Wolf Weapons from Kobayakawa Takakage
- Main Rewards:
Optional
 [Lv. 200] Tower of Oz: Accessible from the Dimensional Mirror. Tower of Oz consists of 50 floors of challenges with a set amount of time limit determined by using
  [Stupid Pills] to extend the time limit
- Based on how far you reach, you will gain "Oz Points" that can be exchanged for items
- Main Rewards:
 [Ryude's Sword],
  [Ocean Glow Earrings],
  [Lightseeker Bow],
  [Alicia's Mutated Staff],
  [Aquarius Crown],

 [Damage Skins]
 - An in-depth guide to the Tower of Oz: https://dexless.com/guides/tower-of-oz-comprehensive-guide.145/
Some notable training maps are:
- Scrapyard - Scrapyard Hill 4: Chaseroid Red and Hunterizer Red
- [Arcane Power 30] Vanishing Journey - Weathered Land of Sorrow: Sad Erda
- [Arcane Power 40] Vanishing Journey - Fire Zone: Blazing Erda
- [Arcane Power 60] Vanishing Journey - Forked Road 1 & Below the Cave : Tranquil Erda & Lantern Erda
- [Arcane Power 40] Reverse City - Subway Tunnel 1 - 6: Erda Rat and Monto
- [Arcane Power 40] Reverse City - T-Boy's Research Train 1 - 3: Seeker T-Drone Model A and Seeker T-Drone Model B
- [Arcane Power 100] Reverse City - Hidden Research Train: Seeker T-Drone Model A and Seeker T-Drone Model B
Level 210
Content Available:
 [Lv. 210] [Daily Quest / Area] Arcane River - Chu Chu Island: Completing the storyline here unlocks your second
  [Arcane Symbol]
- Completing the storyline also unlocks a Weekly Activity and Daily Quests and reduces the requirements of prior Arcane River dailies & weeklies
- [Lv. 210] [Weekly Party Quest] Hungry Muto: Unlocked after completing the Chu Chu Island storyline. Requires 1-4 party members to enter. The main objective is to gather ingredients from monsters to create dishes to feed Muto
- Main Rewards: [Arcane Symbol]
- Main Rewards:
 [Lv. 215] [Area] Yum Yum Island: Accessible from Chu Chu Island
- Main Reward: [Arcane Symbol Selector Coupon]
- Main Reward:
 [Lv. 210] [Boss] Guardian Angel Slime: Accessible from the Boss Contents UI after completing questline starting from the Lightbulb Quest "[Ramuramu] Psych Exam"
- Normal Mode and Above Rewards:
 [Guardian Angel Ring], [Power Elixir], [Sparkling Blue Star Potion], [Sparkling Red Star Potion], [Small EXP Accumulation Potion], [Rebirth Flame Lv. 150], [Powerful Rebirth Flame], [Eternal Rebirth Flame], [50% EXP Coupon Voucher], [Intense Power Crystal], [(Interactive Worlds Only) Bonus Mystical Cube]
 - Chaos Mode Only Rewards: [Black Rebirth Flame],
 [Primal Essence],
  [(Interactive Worlds Only) Incredible Chaos Scroll of Goodness 60%], [(Interactive Worlds Only) Premium Scroll - Accessory Coupon],
  [(Interactive Worlds Only) Premium Scroll - Pet Equipment Coupon],
  [(Interactive Worlds Only) Magical Scroll - Weapon Coupon], [(Interactive Worlds Only) Unrelenting Flame], [(Interactive Worlds Only) Forever Unrelenting Flame], [(Interactive Worlds Only) Forever Unrelenting Black Flame]
- Normal Mode and Above Rewards:
Some notable training maps are:
- [Arcane Power 100] Chu Chu Island - Bitty-Bobble Forest 1: Flyon
- [Arcane Power 130] Chu Chu Island - Torrent Zone 3: Rhyturtle and Boss Rhyturtle
- [Arcane Power 160] Chu Chu Island - Mountain's Mouth: Crilla
- [Arcane Power 130] Yum Yum Island - Mushbud Forest 3 - 6: Bunshroom and Monkeyrog
- [Arcane Power 190] Yum Yum Island - Hidden Illiard Field: Potent Lytone and Potent Stonepy
Level 220
Content Available:
 [Lv. 220] [Daily Quest / Area] Arcane River - Lachelein: Completing the storyline unlocks your third
  [Arcane Symbol]
- Completing the storyline also unlocks a Weekly Activity and Daily Quests and reduces the requirements of prior Arcane River dailies & weeklies
- Monsters in this area drop
 [Arcane River Droplet Stones] that are used to create
  [Phantasma Coins] for exchanging
 [Arcane Umbra Gear]
 [Lv. 225] [Daily Quest / Area] Arcane River - Arcana: Completing the storyline unlocks your fourth
  [Arcane Symbol]
- Completing the storyline also unlocks a Weekly Activity and Daily Quests and reduces the requirements of prior Arcane River dailies & weeklies
- Monsters in this area drop [Arcane River Droplet Stones] that are used to create [Phantasma Coins] for exchanging [Arcane Umbra Gear]
- [Lv. 220] [Weekly] Midnight Chaser: This activity can only be entered alone. The objective is to locate objects scattered around a series of maps
- Main Rewards: [Arcane Symbols]
- Main Rewards:
- [Lv. 225] [Weekly] Spirit Savior: This activity can only be entered alone. The objective is to save Rock Spirits that have been kidnapped while avoiding an evil spirit that chases you
- Main Rewards: [Arcane Symbols]
- Main Rewards:
- [Lv. 220] [Boss] Lucid: Accessible from the Boss Contents UI after completing the Lachelein storyline
- Easy Mode and Above Rewards: [Sparkling Blue Star Potion], [Sparkling Red Star Potion], [Small EXP Accumulation Potion], [Power Elixir], [Lv. 150 Rebirth Flame], [Powerful Rebirth Flame], [Eternal Rebirth Flame], [50% EXP Coupon Voucher], [Soul Shard], [Mystical Cube], [(Interactive Worlds Only) Bonus Mystical Cube], [Intense Power Crystal]
- Normal Mode and Above Rewards:
 [Butterfly Droplet Stone],
  [Twilight Mark]
 - Hard Mode Only Rewards:
 [Lucidroid],
  [Dreamy Belt],
  [Arcane Umbra Armor/Weapon Box], [Black Rebirth Flame],
  [Lucid's Canopy Bed], [(Interactive Worlds Only) Incredible Chaos Scroll of Goodness 60%], [(Interactive Worlds Only) Scroll - Accessory Coupon], [(Interactive Worlds Only) Unrelenting Flame], [(Interactive Worlds Only) Forever Unrelenting Flame], [(Interactive Worlds Only) Forever Unrelenting Black Flame]
 - are used to combine with [Arcane River Droplet Stones] to create [Phantasma Coins] for exchanging
 [(Weapon/Shoe/Glove) Arcane Umbra Gear]
- Easy Mode and Above Rewards:
Some notable training maps are:
- [Arcane Power 210] Lachelein - Chicken Festival 2: Gallus
- [Arcane Power 210] Lachelein - Revelation Place 3: Angry Masquerade Citizen and Insane Masquerade Citizen
- [Arcane Power 210] Lachelein - Occupied Dance Floor 1: Weakened Dreamkeeper
- [Arcane Power 240] Lachelein - Nightmare Clocktower 1F: Dreamkeeper
- [Arcane Power 320] Arcana - Snow Cloud Clearing: Snow Cloud Spirit
- [Arcane Power 320] Arcana - Thunder Cloud Clearing: Thunder Cloud Spirit
- [Arcane Power 360] Arcana - Labyrinthine Cavern and Upper Path 2: Anguished Spirit and Mournful Spirit
- [Arcane Power 360] Arcana - Cavern Lower Path: Befuddled Spirit
Level 230
Content Available:
 [Lv. 230] [Daily Quest / Area] Morass: Completing the storyline unlocks your fifth
  [Arcane Symbol]
- Completing the storyline also unlocks a Weekly Activity and Daily Quests and reduces the requirements of prior Arcane River dailies & weeklies
- Monsters in this area drop [Arcane River Droplet Stones] that are used to create [Phantasma Coins] for exchanging [Arcane Umbra Gear]
- [Lv. 230] [Weekly] Ranheim Defense: This activity can only be entered alone. The objective is to defend a pillar on the middle of the map from invading enemies
- Main Rewards: [Arcane Symbols]
- Main Rewards:
 [Lv. 235] [Daily Quest / Area] Esfera: Completing the storyline unlocks your final
  [Arcane Symbol]
- Completing the storyline also unlocks a Weekly Activity and Daily Quests and reduces the requirements of prior Arcane River dailies & weeklies
- Monsters in this area drop
 [Stone Origin Droplet] which are used to create
  [Arachno Coins] for exchanging

 [(Hat/Overall/Shoulder/Weapon) Arcane Umbra Gear]
- [Lv. 235] [Weekly] Esfera Guardian: This activity can only be entered alone. The objective is to destroy dimensional gates using a turret to aim and shoot
- Main Rewards: [Arcane Symbols]
- Main Rewards:
- [Lv. 235+] [Boss] Will: Acccessible from the Boss Contents UI after completing the Esfera storyline
- Easy Mode and Above Rewards: [Sparkling Blue Star Potion], [Sparkling Red Star Potion], [Small EXP Accumulation Potion], [Power Elixir], [Lv. 150 Rebirth Flame] , [Powerful Rebirth Flame], [Eternal Rebirth Flame], [50% EXP Coupon Voucher], [Intense Power Crystal], [Spell Trace]
- Normal Mode and Above Rewards:
 [Stone Cobweb Droplet], [Twilight Mark]
 - Hard Mode Only Rewards:
 [Will's Cursed Spellbook Selection Box], [Arcane Umbra Armor/Weapon Box],
  [Mirror World Nodestone], [Black Rebirth Flame],
  [Will's Web Swing Chair], [(Interactive Worlds Only) Incredible Chaos Scroll of Goodness 60%], [(Interactive Worlds Only) Scroll - Accessory Coupon], [(Interactive Worlds Only) Unrelenting Flame], [(Interactive Worlds Only) Forever Unrelenting Flame], [(Interactive Worlds Only) Forever Unrelenting Black Flame]
 - are used to combine with [Stone Origin Droplet] to create [Arachno Coin] for exchanging [(Hat/Overall/Shoulder/Weapon) Arcane Umbra Gear]
- Easy Mode and Above Rewards:
Some notable training maps are:
- [Arcane Power 480] Morass - Shadowdance Hall Maps: Blue Shadow and Red Shadow
- [Arcane Power 520] Morass - That Day in Trueffet Maps: Thralled Wizard and Thralled Archer and Thralled Warhammer Knight and Thralled Guard
- [Arcane Power 600] Esfera - Mirror-touched Sea Maps: Aranya and Aranea
- [Arcane Power 640] Esfera - Radiant Temple Maps: Light Executor and Dark Executor
Level 240
Content Available:
 [Lv. 240] [Area] Sellas: Accessible from Esfera
- Main Reward: [Arcane Symbol Selector Coupon],
 [Explorer Diving Helmet],
  [Medal]
- Main Reward:
 [Lv. 245] [Area] Moonbridge: Completing the storyline here unlocks Daily Quests
- Main Reward:
 [Medal]
 - Daily quests reward
 [Spark of Determination] that are used to create
  [Fragment of Destiny] required to enter into the Black Mage
- Main Reward:
- [Lv. 245+] [Boss] Gloom: Accessible from the Boss Contents UI after completing the Moonbridge storyline
- Normal Mode and Above Rewards:
 [Estella Earrings], [Spark of Determination], [Sparkling Blue Star Potion], [Sparkling Red Star Potion], [Small EXP Accumulation Potion], [Power Elixir], [Lv. 150 Rebirth Flame], [Powerful Rebirth Flame], [Eternal Rebirth Flame], [Black Rebirth Flame], [50% EXP Coupon Voucher], [(Interactive Worlds Only) Bonus Mystical Cube], [Intense Power Crystal], [Spell Trace]
 - Chaos Mode Only Rewards:
 [Endless Terror],
  [Gloom Dark Bean Bag], [Primal Essence], [(Interactive Worlds Only) Incredible Chaos Scroll of Goodness 60%], [(Interactive Worlds Only) Premium Scroll - Accessory Coupon], [(Interactive Worlds Only) Premium Scroll - Pet Equipment Coupon], [(Interactive Worlds Only) Magical Scroll - Weapon Coupon], [(Interactive Worlds Only) Unrelenting Flame], [(Interactive Worlds Only) Forever Unrelenting Flame], [(Interactive Worlds Only) Forever Unrelenting Black Flame]
- Normal Mode and Above Rewards:
Some notable training maps are:
- [Arcane Power 670] Moonbridge - Last Horizon Maps: Soot Talon and Soot Beast
- [Arcane Power 730] Moonbridge - Void Current Maps: Burst Glare and Crushing Glare
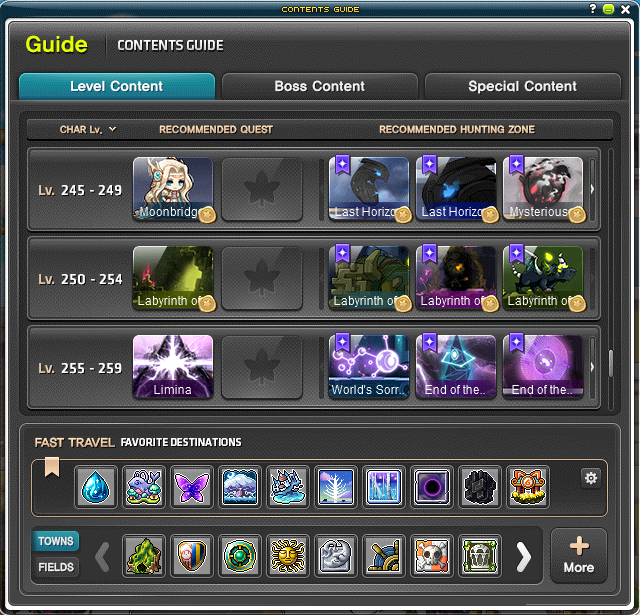
Level 250+
Content Available:
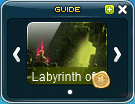
 [Lv. 250] [Area] Labyrinth of Suffering: Completing the storyline here unlocks Daily Quests
- Main Reward:
 [Medal]
 - Daily quests reward [Spark of Determination] that are used to create [Fragment of Destiny] required to enter into the Black Mage
- Main Reward:
 [Lv. 255] [Area] Limina: Completing the storyline here unlocks Daily Quests
- Main Reward:
 [Medal]
 - Daily quests reward [Spark of Determination] that are used to create [Fragment of Destiny] required to enter into the Black Mage
- Main Reward:
 [Lv. 260] [Area] Cernium: Completing the storyline here unlocks your first
  Sacred Symbol
- Main Reward:
 [Medal]
 - Completing the storyline also unlocks Daily Quests that reward [Sacred Symbol]
- Main Reward:
- [Lv. 260] [Area] Burning Cernium
- Main Reward:
 [Medal]
- Main Reward:
 [Lv. 265] [Area] Hotel Arcus: Completing the storyline here unlocks your second
  Sacred Symbol
- Main Reward:
 [Medal]
 - Completing the storyline also unlocks Daily Quests that reward [Sacred Symbol]
- Main Reward:
- [Lv. 250+] [Boss] Verus Hilla: Accessible from the Boss Contents UI after completing the Labyrinth of Suffering storyline
- Normal Mode and Above Rewards:
 [Daybreak Pendant], [Arcane Umbra Armor/Weapon Box], [Sparkling Blue Star Potion], [Sparkling Red Star Potion], [Small EXP Accumulation Potion], [Power Elixir], [Lv. 150 Rebirth Flame], [Powerful Rebirth Flame], [Eternal Rebirth Flame], [Black Rebirth Flame], [50% EXP Coupon Voucher], [Soul Shard], [Intense Power Crystal], [Spell Trace], [(Interactive Worlds Only) Bonus Mystical Cube], [(Interactive Worlds Only) Incredible Chaos Scroll of Goodness 60%]
 - Hard Mode Only Rewards:
 [Source of Suffering],
  [Shadow of Annihilation],
  [Soul Candle], [Primal Essence], [(Interactive Worlds Only) Premium Scroll - Accessory Coupon], [(Interactive Worlds Only) Premium Scroll - Pet Equipment Coupon], [(Interactive Worlds Only) Magical Scroll - Weapon Coupon], [(Interactive Worlds Only) Unrelenting Flame], [(Interactive Worlds Only) Forever Unrelenting Flame], [(Interactive Worlds Only) Forever Unrelenting Black Flame]
- Normal Mode and Above Rewards:
- [Lv. 255+] [Boss] Darknell: Accessible from the Boss Contents UI after completing the storyline in Limina
- Normal Mode and Above Rewards: [Estella Earrings], [Spark of Determination], [Sparkling Blue Star Potion], [Sparkling Red Star Potion], [Small EXP Accumulation Potion], [Power Elixir], [Lv. 150 Rebirth Flame], [Powerful Rebirth Flame], [Eternal Rebirth Flame], [Black Rebirth Flame], [50% EXP Coupon Voucher], [Soul Shard], [Intense Power Crystal], [Spell Trace], [(Interactive Worlds Only) Bonus Mystical Cube]
- Hard Mode Only Rewards:
 [Commanding Force Earrings], [Arcane Umbra Armor/Weapon Box],
  [Darknell's Helmet Decoration], [Primal Essence], [(Interactive Worlds Only) Premium Scroll - Accessory Coupon], [(Interactive Worlds Only) Premium Scroll - Pet Equipment Coupon], [(Interactive Worlds Only) Magical Scroll - Weapon Coupon], [(Interactive Worlds Only) Incredible Chaos Scroll of Goodness 60%], [(Interactive Worlds Only) Unrelenting Flame], [(Interactive Worlds Only) Forever Unrelenting Flame], [(Interactive Worlds Only) Forever Unrelenting Black Flame]
- Normal Mode and Above Rewards:
- [Lv. 255+] [Boss] Black Mage: [Fragment of Destiny] is required to enter and fight the Black Mage
- Main Rewards:
 [Sealed Genesis Weapon Box],
  [Genesis Badge], [Arcane Umbra Armor/Weapon Box],
  [Black Mage's Mirror], [Primal Essence], [Sparkling Blue Star Potion], [Sparkling Red Star Potion], [Small EXP Accumulation Potion], [Power Elixir], [Lv. 150 Rebirth Flame], [Powerful Rebirth Flame], [Eternal Rebirth Flame], [Black Rebirth Flame], [50% EXP Coupon Voucher], [Intense Power Crystal], [Spell Trace], [(Interactive Worlds Only) Bonus Mystical Cube], [(Interactive Worlds Only) Premium Scroll - Accessory Coupon], [(Interactive Worlds Only) Premium Scroll - Pet Equipment Coupon], [(Interactive Worlds Only) Magical Scroll - Weapon Coupon], [(Interactive Worlds Only) Incredible Chaos Scroll of Goodness 60%], [(Interactive Worlds Only) Unrelenting Flame], [(Interactive Worlds Only) Forever Unrelenting Flame], [(Interactive Worlds Only) Forever Unrelenting Black Flame]
- Main Rewards:
- [Lv. 260+] [Boss] Seren: Accessible from the Boss Contents UI after completing Burning Cernium storyline
- Main Rewards:
 [Mitra's Rage Selection Box],
  [Mitra's Nodestone], [Daybreak Pendant], [Primal Essence], [Sparkling Blue Star Potion], [Sparkling Red Star Potion], [Small EXP Accumulation Potion], [Power Elixir], [Lv. 150 Rebirth Flame], [Powerful Rebirth Flame], [Eternal Rebirth Flame], [Black Rebirth Flame], [50% EXP Coupon Voucher], [Intense Power Crystal], [Spell Trace], [(Interactive Worlds Only) Bonus Mystical Cube], [(Interactive Worlds Only) Premium Scroll - Accessory Coupon], [(Interactive Worlds Only) Premium Scroll - Pet Equipment Coupon], [(Interactive Worlds Only) Magical Scroll - Weapon Coupon], [(Interactive Worlds Only) Incredible Chaos Scroll of Goodness 60%], [(Interactive Worlds Only) Unrelenting Flame], [(Interactive Worlds Only) Forever Unrelenting Flame], [(Interactive Worlds Only) Forever Unrelenting Black Flame]
- Main Rewards:
 [Lv. 265+] [Boss] Kalos: Accessible from the Boss Contents UI after completing the [Karote] Kalos the Guardian questline and defeating Story Mode Kalos
- Main Rewards:
 [Kalos's Residual Determination],
  [Kalos Ceiling Fan], [Primal Essence], [Sparkling Blue Star Potion], [Sparkling Red Star Potion], [Small EXP Accumulation Potion], [Power Elixir], [Lv. 150 Rebirth Flame], [Powerful Rebirth Flame], [Eternal Rebirth Flame], [Black Rebirth Flame], [Soul Shard], [Mystical Cube], [50% EXP Coupon Voucher], [Intense Power Crystal], [Spell Trace], [(Interactive Worlds Only) Bonus Mystical Cube], [(Interactive Worlds Only) Premium Scroll - Accessory Coupon], [(Interactive Worlds Only) Premium Scroll - Pet Equipment Coupon], [(Interactive Worlds Only) Magical Scroll - Weapon Coupon], [(Interactive Worlds Only) Incredible Chaos Scroll of Goodness 60%], [(Interactive Worlds Only) Unrelenting Flame], [(Interactive Worlds Only) Forever Unrelenting Flame], [(Interactive Worlds Only) Forever Unrelenting Black Flame]
- Main Rewards: